Blender VFX add-on#
Overview#
This Blender add-on allows for compositing with a Nerfstudio render as a background layer by generating a camera path JSON file from the Blender camera path, as well as a way to import Nerfstudio JSON files as a Blender camera baked with the Nerfstudio camera path. This add-on also allows compositing multiple NeRF objects into a NeRF scene. This is achieved by importing a mesh or point-cloud representation of the NeRF scene from Nerfstudio into Blender and getting the camera coordinates relative to the transformations of the NeRF representation. Dynamic FOV from the Blender camera is supported and will match the Nerfstudio render. Perspective, equirectangular, VR180, and omnidirectional stereo (VR 360) cameras are supported. This add-on also supports Gaussian Splatting scenes as well, however equirectangular and VR video rendering is not currently supported for splats.

Add-on Setup Instructions#
The add-on requires Blender 3.0 or newer, install Blender here.
Download Blender Add-on Script
Install and enable the add-on in Blender in
Edit → Preferences → Add-Ons. The add-on will be visible in the Render Properties tab on the right panel.
The add-on should now be installed in the
Render Propertiespanel
Scene Setup#
Export the mesh or point cloud representation of the NeRF from Nerfstudio, which will be used as reference for the actual NeRF in the Blender scene. Mesh export at a good quality is preferred, however, if the export is not clear or the NeRF is large, a detailed point cloud export will also work. Keep the
save_world_frameflag as False or in the viewer, de-select the “Save in world frame” checkbox to keep the correct coordinate system for the add-on.Import the mesh or point cloud representation of the NeRF into the scene. You may need to crop the mesh further. Since it is used as a reference and won’t be visible in the final render, only the parts that the blender animation will interact with may be necessary to import.
Select the NeRF mesh or point cloud in the add-on.
Resize, position, or rotate the NeRF representation to fit your scene.
Generate Nerfstudio JSON Camera Path from Blender Camera#
There are a few ways to hide the reference mesh for the Blender render
In object properties, select “Shadow Catcher”. This makes the representation invisible in the render, but all shadows cast on it will render. You may have to switch to the cycles renderer to see the shadow catcher option.

Note: This may not give ideal results if the mesh is not very clear or occludes other objects in the scene. If this is the case, you can hide the mesh from the render instead by clicking the camera button in the Outliner next to its name.

Verify that the animation plays and the NeRF representation does not occlude the camera.
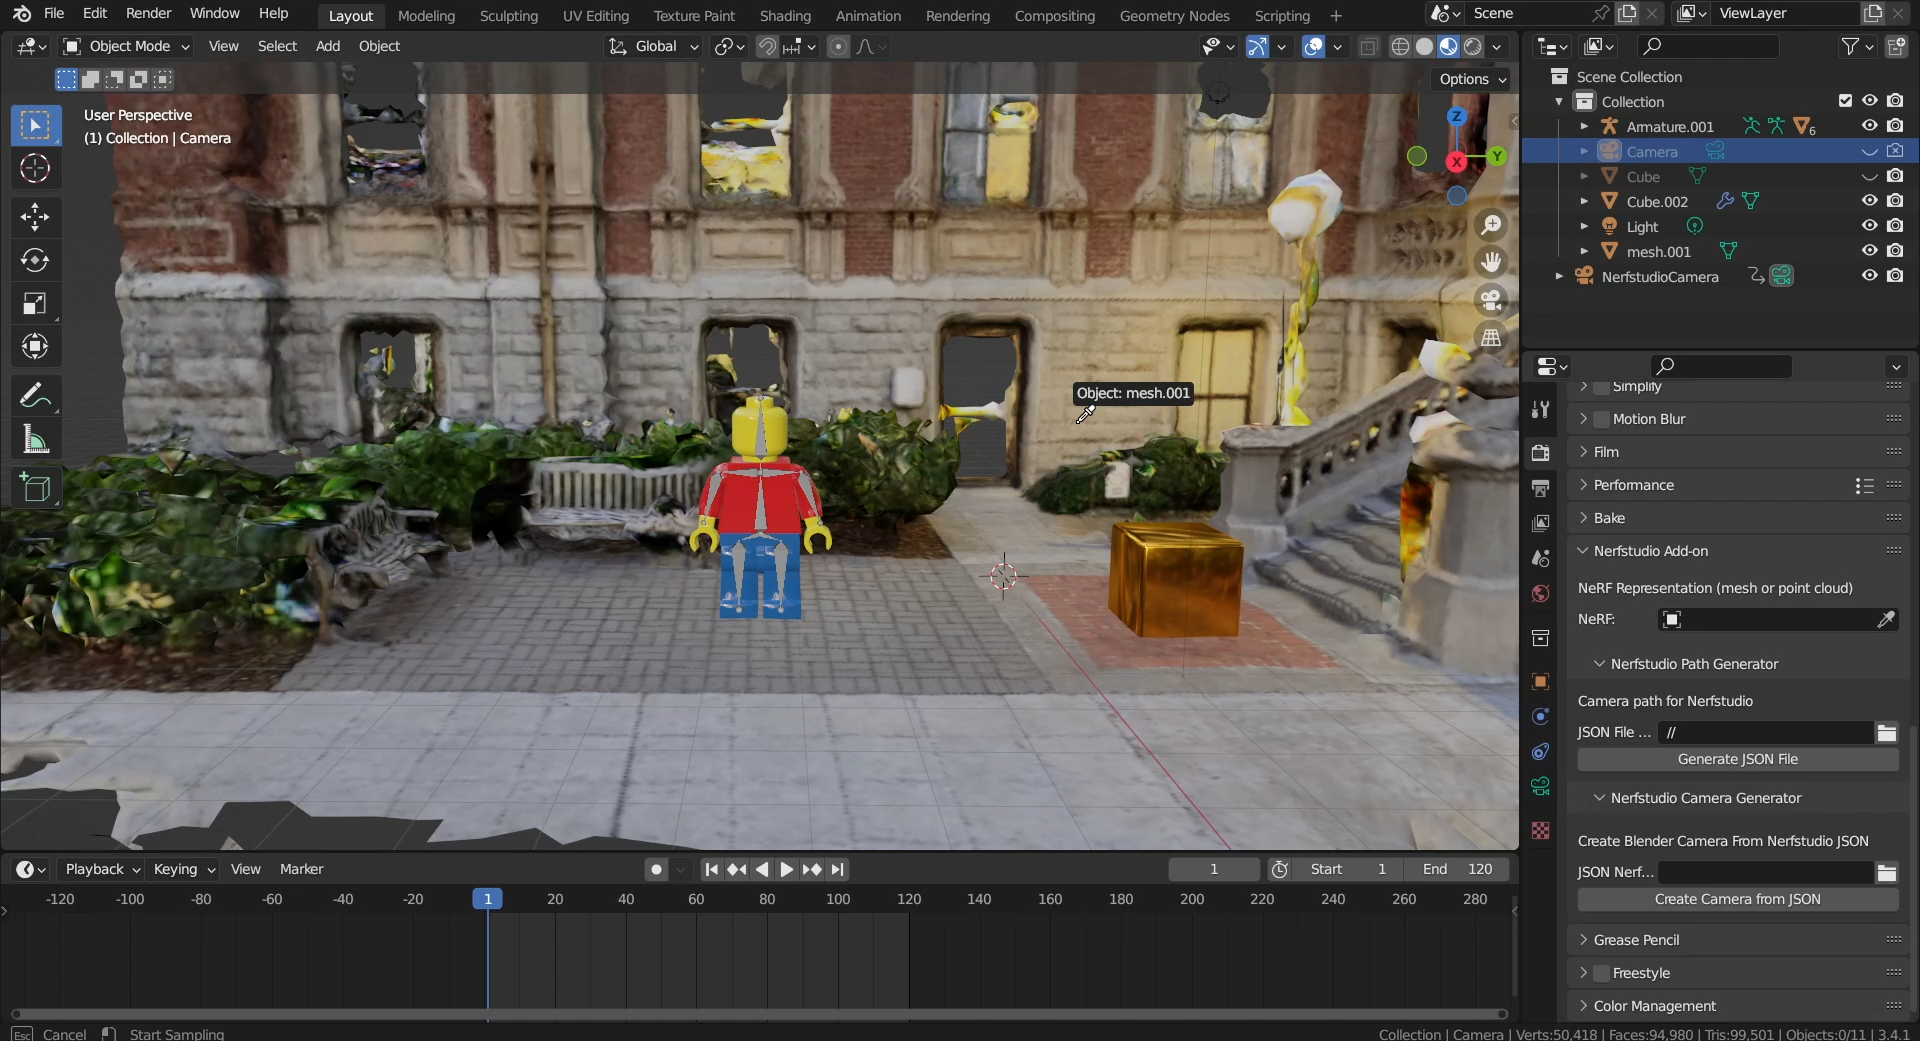
Go to the Nerfstudio Add-on in Render Properties and expand the “Nerfstudio Path Generator” tab in the panel. Use the object selector to select the NeRF representation. Then, select the file path for the output JSON camera path file.
Click “Generate JSON file”. The output JSON file is named
camera_path_blender.json.
Render the NeRF with the generated camera path using Nerfstudio in the command prompt or terminal.
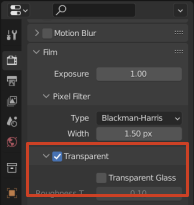
Before rendering the Blender animation, go to the Render Properties and in the Film settings select “Transparent” so that the render will be rendered with a clear background to allow it to be composited over the NeRF render.
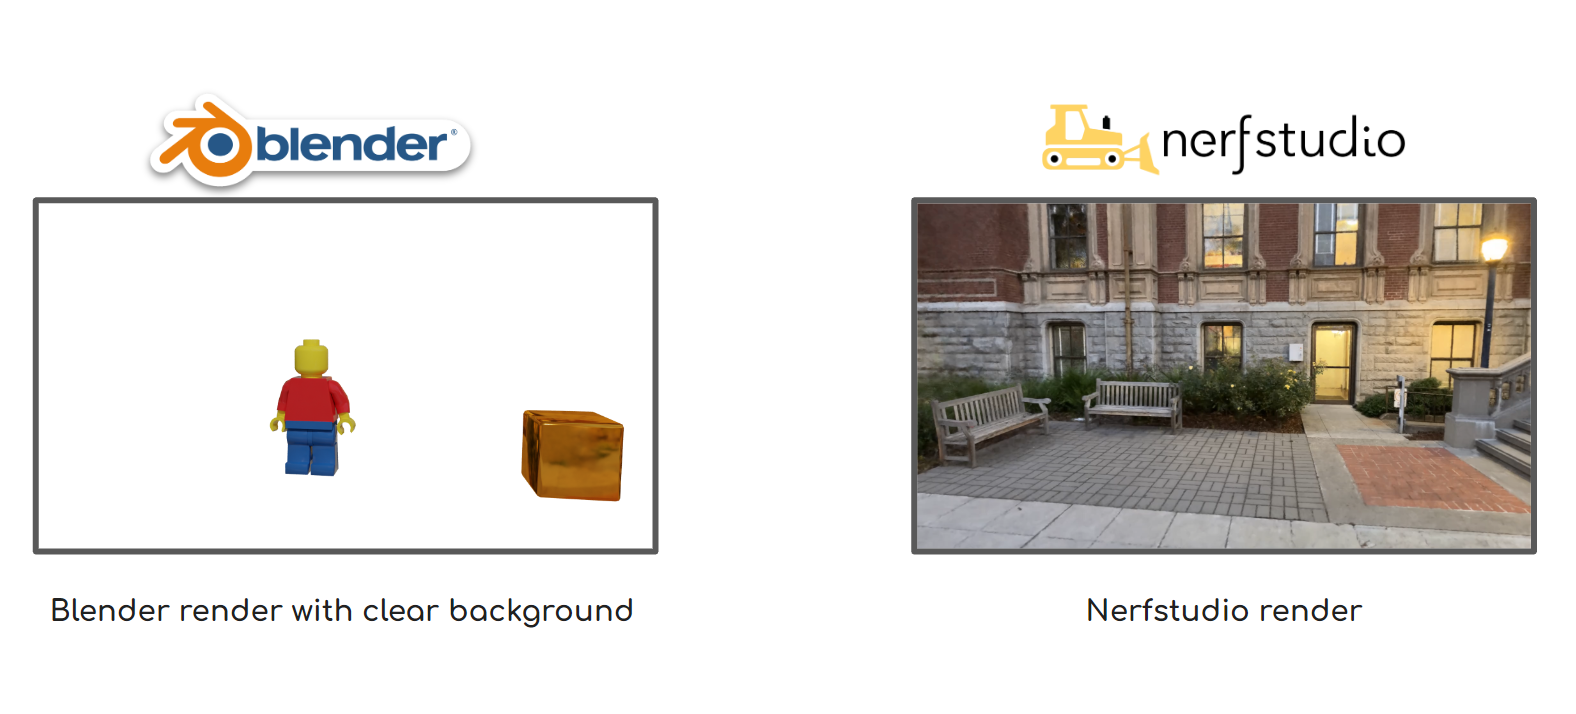
Now the scene can be rendered and composited over the camera aligned Nerfstudio render.
Examples#


Additional details#
You can also apply an environment texture to the Blender scene by using Nerfstudio to render an equirectangular image (360 image) of the NeRF from a place in the scene.
The settings for the Blender equirectangular camera are: “Panoramic” camera type and panorama type of “Equirectangular”.

The generated JSON camera path follows the user specified frame start, end, and step fields in the Output Properties in Blender. The JSON file specifies the user specified x and y render resolutions at the given % in the Output Properties.
The add-on computes the camera coordinates based on the active camera in the scene.
FOV animated changes of the camera will be matched with the NeRF render.
Perspective, equirectangular, VR180, and omnidirectional stereo cameras are supported and can be configured within Blender.
The generated JSON file can be imported into Nerfstudio. Each keyframe of the camera transform in the frame sequence in Blender will be a keyframe in Nerfstudio. The exported JSON camera path is baked, where each frame in the sequence is a keyframe. This is to ensure that frame interpolation across Nerfstudio and Blender do not differ.
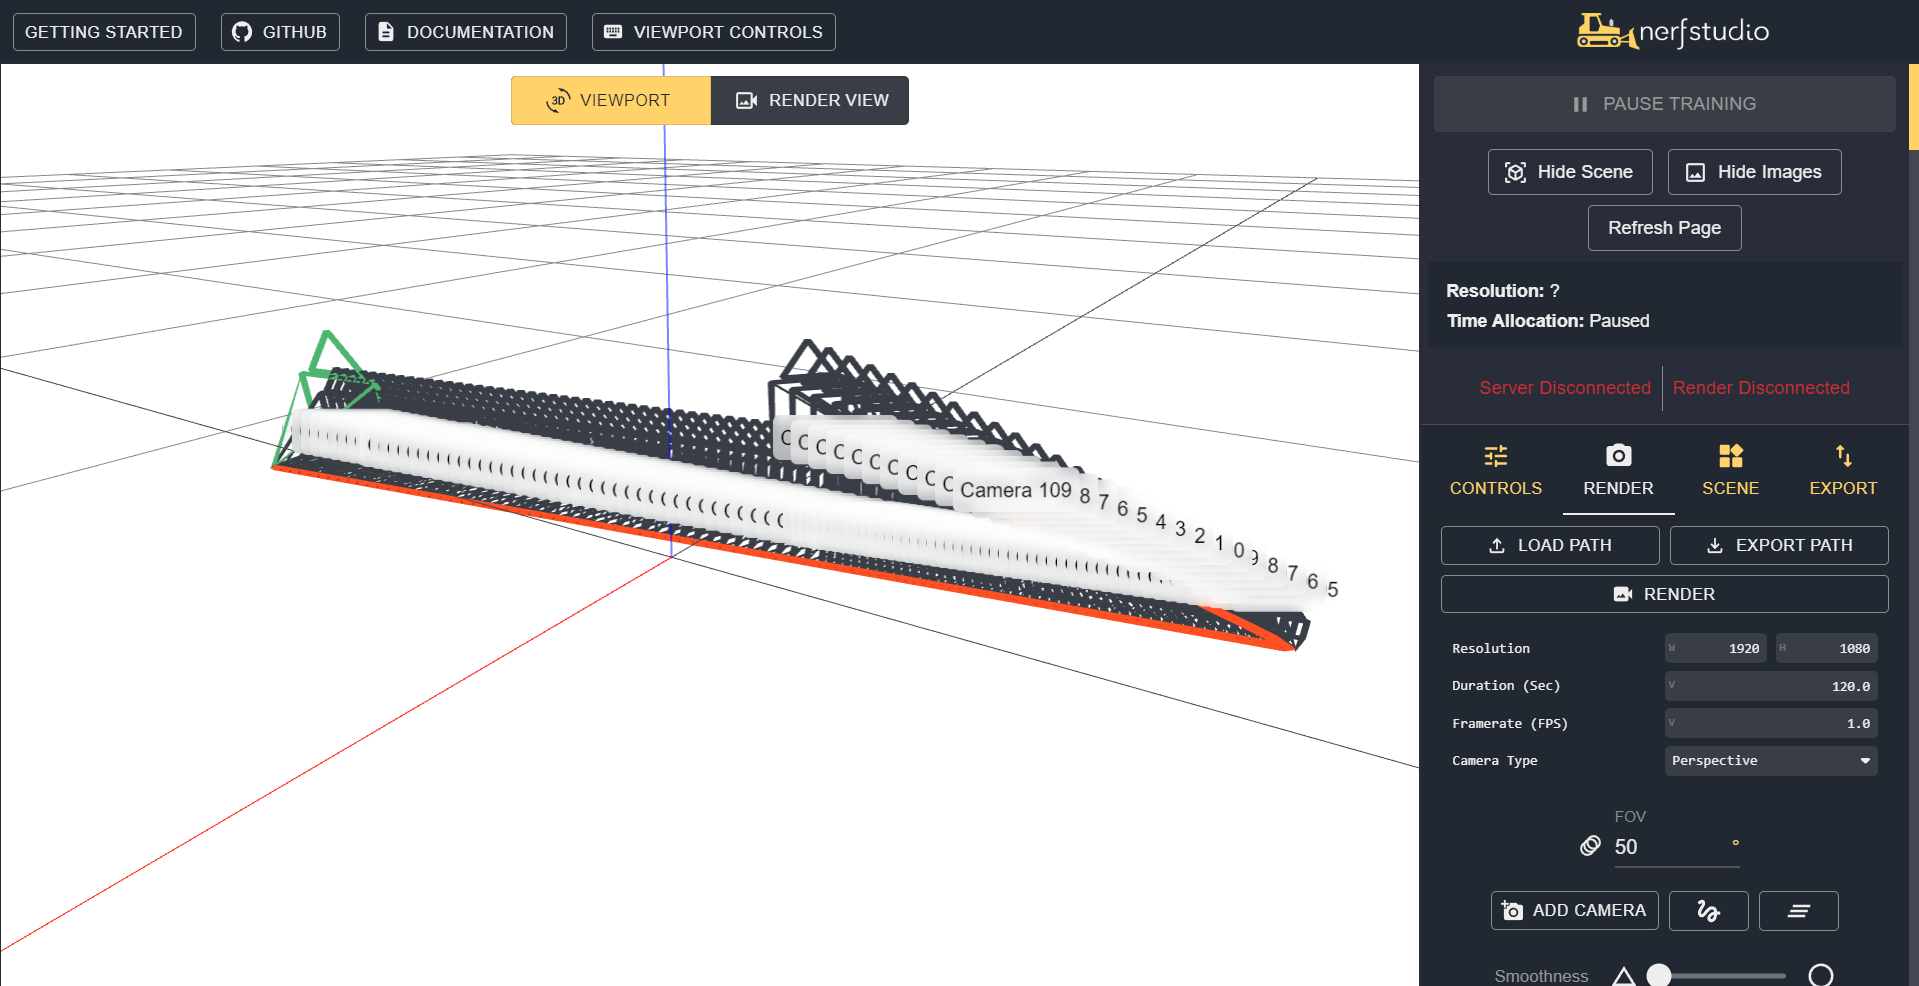
It is recommended to run the camera path in the Nerfstudio web interface with the NeRF to ensure that the NeRF is visible throughout the camera path.
The fps and keyframe timestamps are based on the “Frame Rate” setting in the Output Properties in Blender.
The NeRF representation can also be transformed (position, rotation, and scale) as well as animated.
The pivot point of the NeRF representation should not be changed
It is recommended to export a high fidelity mesh as the NeRF representation from Nerfstudio. However if that is not possible or the scene is too large, a point cloud representation also works.
For compositing, it is recommended to convert the video render into image frames to ensure the Blender and NeRF renders are in sync.
Currently, dynamic camera focus is not supported.
Compositing with Blender Objects and VR180 or ODS Renders
Configure the Blender camera to be panoramic equirectangular and enable stereoscopy in the Output Properties. For the VR180 Blender camera, set the panoramic longitude min and max to -90 and 90.
Under the Stereoscopy panel the Blender camera settings, change the mode to “Parallel”, set the Interocular Distance to 0.064 m, and checkmark “Spherical Stereo”.

Fisheye and orthographic cameras are not supported.
Renders with Gaussian Splats are supported, but the point cloud or mesh representation would need to be generated from training a NeRF on the same dataset.
A walkthrough of this section is included in the tutorial video.
Create Blender Camera from Nerfstudio JSON Camera Path#

Expand the “Nerfstudio Camera Generator” tab in the panel. After inputting the NeRF representation, select the JSON Nerfstudio file and click “Create Camera from JSON”
A new camera named “NerfstudioCamera” should appear in the viewport with the camera path and FOV of the input file. This camera’s type will match the Nerfstudio input file, except fisheye cameras.
Additional details#
Since only the camera path, camera type, and FOV are applied on the created Blender camera, the timing and duration of the animation may need to be adjusted.
Fisheye cameras imported from Nerfstudio are not supported and will default to perspective cameras.
Animated NeRF representations will not be reflected in the imported camera path animation.
The newly created camera is not active by default, so you may need to right click and select “Set Active Camera”.
The newly created Blender camera animation is baked, where each frame in the sequence is a keyframe. This is to ensure that frame interpolation across Nerfstudio and Blender do not differ.
The resolution settings from the input JSON file do not affect the Blender render settings
Scale of the camera is not keyframed from the Nerfstudio camera path.
This newly created camera has a sensor fit of “Vertical”
Compositing NeRF Objects in NeRF Environments#
You can composite NeRF objects into a scene with a NeRF background by rendering the cropped NeRF object along with an accumulation render as an alpha mask and compositing that over the background NeRF render.

Import the background NeRF scene as a point cloud (or mesh, but point cloud is preferred for large scenes).
Export a cropped NeRF mesh of the NeRF object(s)
Open the NeRF object from the Nerfstudio viewer and select “Crop Viewport” and accordingly adjust the Scale and Center values of the bounding box to crop the NeRF scene to around the bounds of the object of interest.

Copy over the scale and center values into the Export panel and export the NeRF object as a mesh (point cloud will also work but shadows can be rendered if the object is a mesh)
Keep note of the scale and center values for the crop. This can be done by creating a new JSON camera path in the editor which will add a crop section towards the end of the file.

Import the NeRF object representation. Rescale and position the scene and NeRF object and background environment. You can also animate either of them.
(Optional) To add shadows of the NeRF object(s)
Add a plane representing the ground of the environment. In object properties, select “Shadow Catcher” under Visibility. You may have to switch to the cycles renderer to see the shadow catcher option.
In the object properties of the NeRF object, go to the Ray Visibility section and deselect the “Camera” option. This will hide the mesh in the Blender render, but keep its shadow.

Render the Blender animation with only the shadow of the object on the shadow catcher visible. Render with a transparent background by selecting “Transparent” under the Film Settings in the Render Properties.
Go to the Nerfstudio Add-on in Render Properties and expand the “Nerfstudio Path Generator” tab in the panel. Use the object selector to select the NeRF environment representation. Then, select the file path for the output JSON camera path file. Click “Generate JSON file”. The output JSON file is named
camera_path_blender.json. It is recommended to rename this JSON file to keep track of the multiple camera paths that will be used to construct the full render.Generate a Nerfstudio camera path now for the NeRF object. Select the object selector to select the NeRF object. Before generating the new JSON file, you may need to rename the previously generated camera path for the environment or move it to a different directory otherwise the new JSON file will overwrite it. Click “Generate JSON file”. The new output JSON file is named
camera_path_blender.json. You will need to repeat this process for each NeRF object you want to composite in your scene.Render the NeRF of the background environment using the generated camera path for the environment using the Nerfstudio in the command line or terminal.
Render the NeRF object
Open the recently generated blender Nerfstudio JSON camera path and add the crop parameters to the camera path. This section will be placed towards the end of the Blender Nerfstudio camera path after the
is_cyclefield. This can be done by copying over the crop section from the JSON camera path with the scene crop which was exported earlier. Alternatively, you can enter the crop values manually in this format.

Render the NeRF object using Nerfstudio and the edited camera path in the command line or terminal. This will be the RGB render.
Next, render the accumulation render as an alpha mask of the NeRF object by adding the command line argument
--rendered-output-names accumulationto the render command.

Convert each of the Nerfstudio render videos into an image sequence of frames as PNG or JPG files. This will ensure that the frames will be aligned when compositing. You can convert the video mp4 to an image sequence by creating a Blender Video Editing file and rendering the mp4 as JPGs or PNGs.
Composite the NeRF renders in a video editing software such as Adobe Premiere Pro.
Place the render of the Nerfstudio background environment at the lowest layer, then place the shadow render of the NeRF object if created.
Place the RGB NeRF render of the NeRF object over the environment (and shadow if present) layers and then place the accumulation NeRF object render over the RGB NeRF object render.
Apply a filter to use the accumulation render as an alpha mask. In Premiere Pro, apply the effect “Track Matte Key” to the RGB render and select the “Matte” as the video track of the accumulation render and under “Composite Using” select “Matte Luma”.
Additional Details#
The RGB and accumulation renders will need to be rendered for each NeRF cropped object in the scene, but not for the NeRF environment if it is not cropped.
If you will composite a shadow layer, the quality of the exported mesh of the NeRF object should have enough fidelity to cast a shadow, but the texture doesn’t need to be clear.
If motion tracking or compositing over real camera footage, you can add planes or cubes to represent walls or doorways as shadow catcher or holdout objects. This will composite the shadow layer over the NeRF environment and help create alpha masks.
The pivot point of the NeRF representations should not be changed.
A walkthrough of this section is included in the tutorial video.
Examples#


Implementation Details#
For generating the JSON camera path, we iterate over the scene frame sequence (from the start to the end with step intervals) and get the camera 4x4 world matrix at each frame. The world transformation matrix gives the position, rotation, and scale of the camera. We then obtain the world matrix of the NeRF representation at each frame and transform the camera coordinates with this to get the final camera world matrix. This allows us to re-position, rotate, and scale the NeRF representation in Blender and generate the right camera path to render the NeRF accordingly in Nerfstudio. Additionally, we calculate the FOV of the camera at each frame based on the sensor fit (horizontal or vertical), angle of view, and aspect ratio.
Next, we construct the list of keyframes which is very similar to the world matrices of the transformed camera matrix.
Camera properties in the JSON file are based on user specified fields such as resolution (user specified in Output Properties in Blender), camera type (Perspective or Equirectangular). In the JSON file, aspect is specified as 1.0, smoothness_value is set to 0, and is_cycle is set to false. The Nerfstudio render is the fps specified in Blender where the duration is the total number of frames divided by the fps.
Finally, we construct the full JSON object and write it to the file path specified by the user.
For generating the camera from the JSON file, we create a new Blender camera based on the input file and iterate through the camera_path field in the JSON to get the world matrix of the object from the matrix_to_world and similarly get the FOV from the fov fields. At each iteration, we set the camera to these parameters and insert a keyframe based on the position, rotation, and scale of the camera as well as the focal length of the camera based on the vertical FOV input.