Using custom data#
Training model on existing datasets is only so fun. If you would like to train on self captured data you will need to process the data into the nerfstudio format. Specifically we need to know the camera poses for each image.
To process your own data run:
ns-process-data {video,images,polycam,record3d} --data {DATA_PATH} --output-dir {PROCESSED_DATA_DIR}
A full set of arguments can be found here.
We currently support the following custom data types:
Data |
Capture Device |
Requirements |
|
|---|---|---|---|
📷 Images |
Any |
🐢 |
|
📹 Video |
Any |
🐢 |
|
🌎 360 Data |
Any |
🐢 |
|
📱 Polycam |
IOS with LiDAR |
🐇 |
|
IOS or Android |
🐇 |
||
📱 Record3D |
IOS with LiDAR |
🐇 |
|
IOS, OAK, others |
🐇 |
||
Any |
🐇 |
||
Any |
🐇 |
||
🖥 ODM |
Any |
🐇 |
|
👓 Aria |
Aria glasses |
🐇 |
Images or Video#
To assist running on custom data we have a script that will process a video or folder of images into a format that is compatible with nerfstudio. We use COLMAP and FFmpeg in our data processing script, please have these installed. We have provided a quickstart to installing COLMAP below, FFmpeg can be downloaded from here
Tip
COLMAP can be finicky. Try your best to capture overlapping, non-blurry images.
Processing Data#
ns-process-data {images, video} --data {DATA_PATH} --output-dir {PROCESSED_DATA_DIR}
Training on your data#
ns-train nerfacto --data {PROCESSED_DATA_DIR}
Training and evaluation on separate data#
For ns-process-data {images, video}, you can optionally use a separate image directory or video for training and evaluation, as suggested in Nerfbusters. To do this, run ns-process-data {images, video} --data {DATA_PATH} --eval-data {EVAL_DATA_PATH} --output-dir {PROCESSED_DATA_DIR}. Then when running nerfacto, run ns-train nerfacto --data {PROCESSED_DATA_DIR} nerfstudio-data --eval-mode filename.
Installing COLMAP#
There are many ways to install COLMAP, unfortunately it can sometimes be a bit finicky. If the following commands do not work, please refer to the COLMAP installation guide for additional installation methods. COLMAP install issues are common! Feel free to ask for help in on our Discord.
We recommend trying conda:
conda install -c conda-forge colmap
Check that COLMAP 3.8 with CUDA is successfully installed:
colmap -h
If that doesn’t work, you can try VKPG:
git clone https://github.com/microsoft/vcpkg
cd vcpkg
./bootstrap-vcpkg.sh
./vcpkg install colmap[cuda]:x64-linux
git clone https://github.com/microsoft/vcpkg
cd vcpkg
./bootstrap-vcpkg.sh
./vcpkg install colmap:x64-linux
If that doesn’t work, you will need to build from source. Refer to the COLMAP installation guide for details.
git clone https://github.com/microsoft/vcpkg
cd vcpkg
./bootstrap-vcpkg.sh
./vcpkg install colmap
git clone https://github.com/microsoft/vcpkg
cd vcpkg
.\bootstrap-vcpkg.bat
.\vcpkg install colmap[cuda]:x64-windows
git clone https://github.com/microsoft/vcpkg
cd vcpkg
.\bootstrap-vcpkg.sh
.\vcpkg install colmap:x64-windows
Polycam Capture#
Nerfstudio can also be trained directly from captures from the Polycam app. This avoids the need to use COLMAP. Polycam’s poses are globally optimized which make them more robust to drift (an issue with ARKit or SLAM methods).
To get the best results, try to reduce motion blur as much as possible and try to view the target from as many viewpoints as possible. Polycam recommends having good lighting and moving the camera slowly if using auto mode. Or, even better, use the manual shutter mode to capture less blurry images.
Note
A LiDAR enabled iPhone or iPad is necessary.
Setting up Polycam#
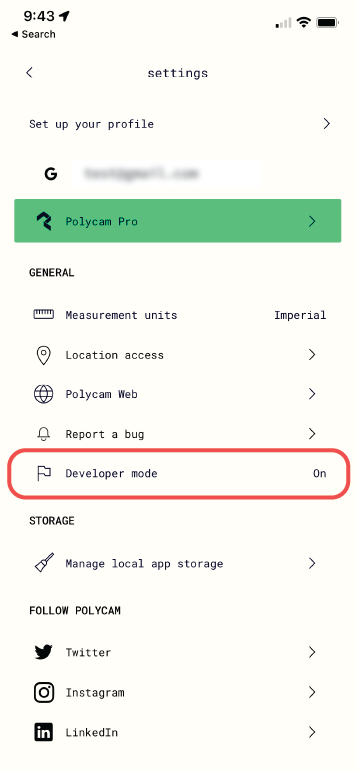
Developer settings must be enabled in Polycam. To do this, navigate to the settings screen and select Developer mode. Note that this will only apply for future captures, you will not be able to process existing captures with nerfstudio.
Process data#
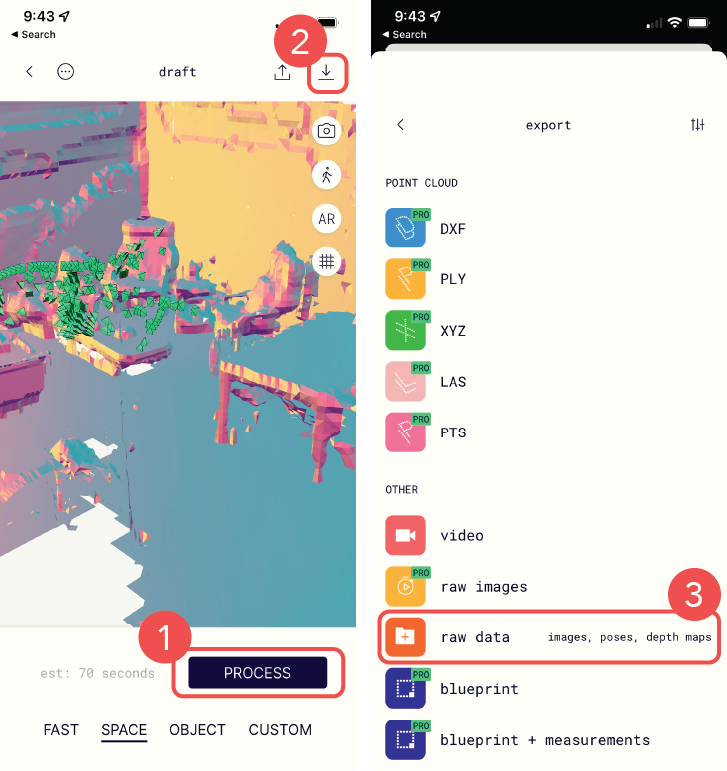
Capture data in LiDAR or Room mode.
Tap
Processto process the data in the Polycam app.Navigate to the export app pane.
Select
raw datato export a.zipfile.Convert the Polycam data into the nerfstudio format using the following command:
ns-process-data polycam --data {OUTPUT_FILE.zip} --output-dir {output directory}
Train with nerfstudio!
ns-train nerfacto --data {output directory}
KIRI Engine Capture#
Nerfstudio can trained from data processed by the KIRI Engine app. This works for both Android and iPhone and does not require a LiDAR supported device.
Note
ns-process-data does not need to be run when using KIRI Engine.
Setting up KIRI Engine#
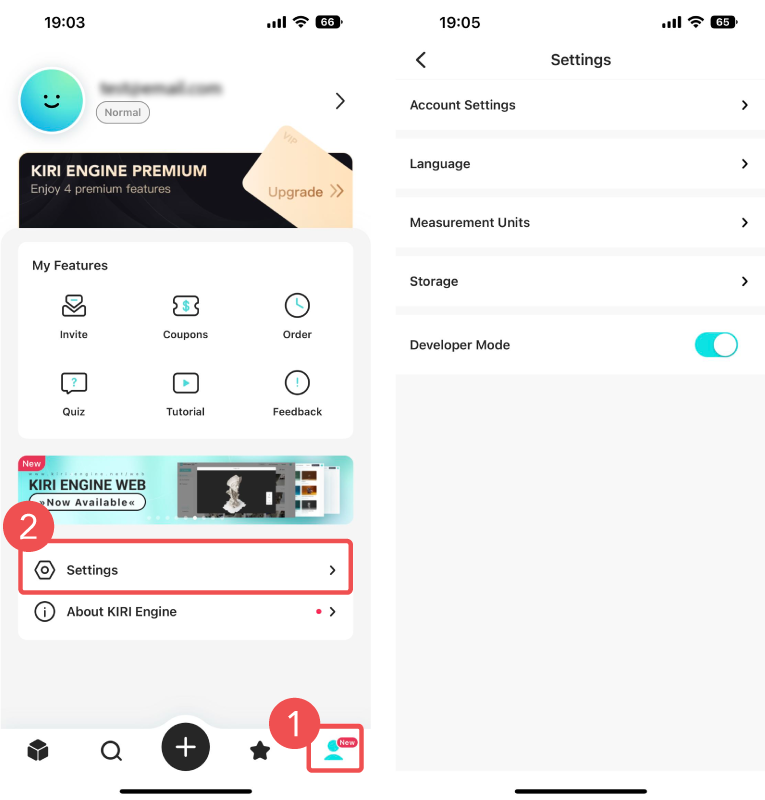
After downloading the app, Developer Mode needs to be enabled. A toggle can be found in the settings menu.
Process data#
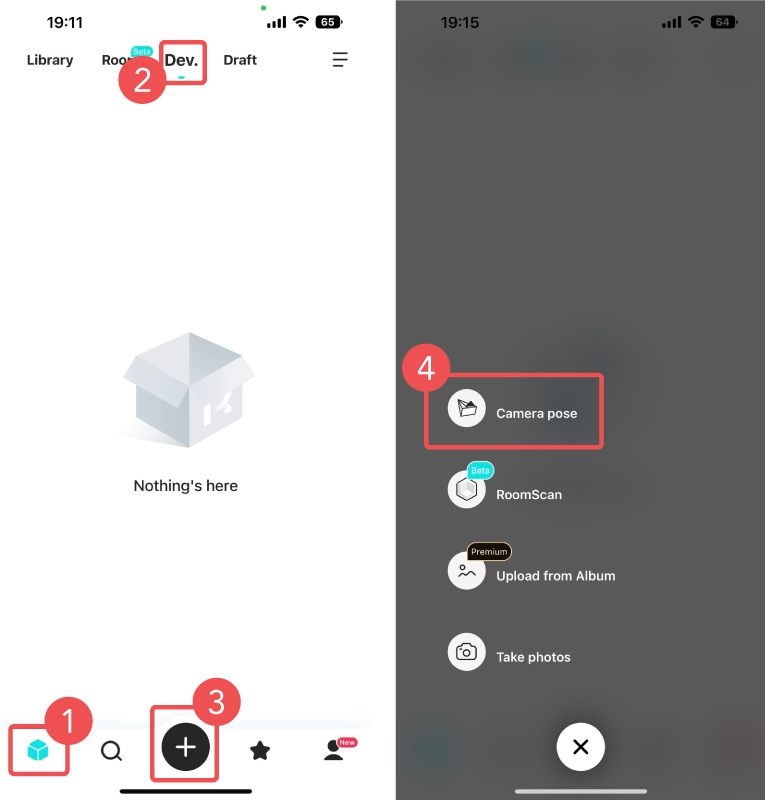
Navigate to captures window.
Select
Dev.tab.Tap the
+button to create a new capture.Choose
Camera poseas the capture option.Capture the scene and provide a name.
After processing is complete, export the scene. It will be sent to your email.
Unzip the file and run the training script (
ns-process-datais not necessary).
ns-train nerfacto --data {kiri output directory}
Record3D Capture#
Nerfstudio can be trained directly from >=iPhone 12 Pro captures from the Record3D app. This uses the iPhone’s LiDAR sensors to calculate camera poses, so COLMAP is not needed.
Click on the image down below 👇 for a 1-minute tutorial on how to run nerfstudio with Record3D from start to finish.
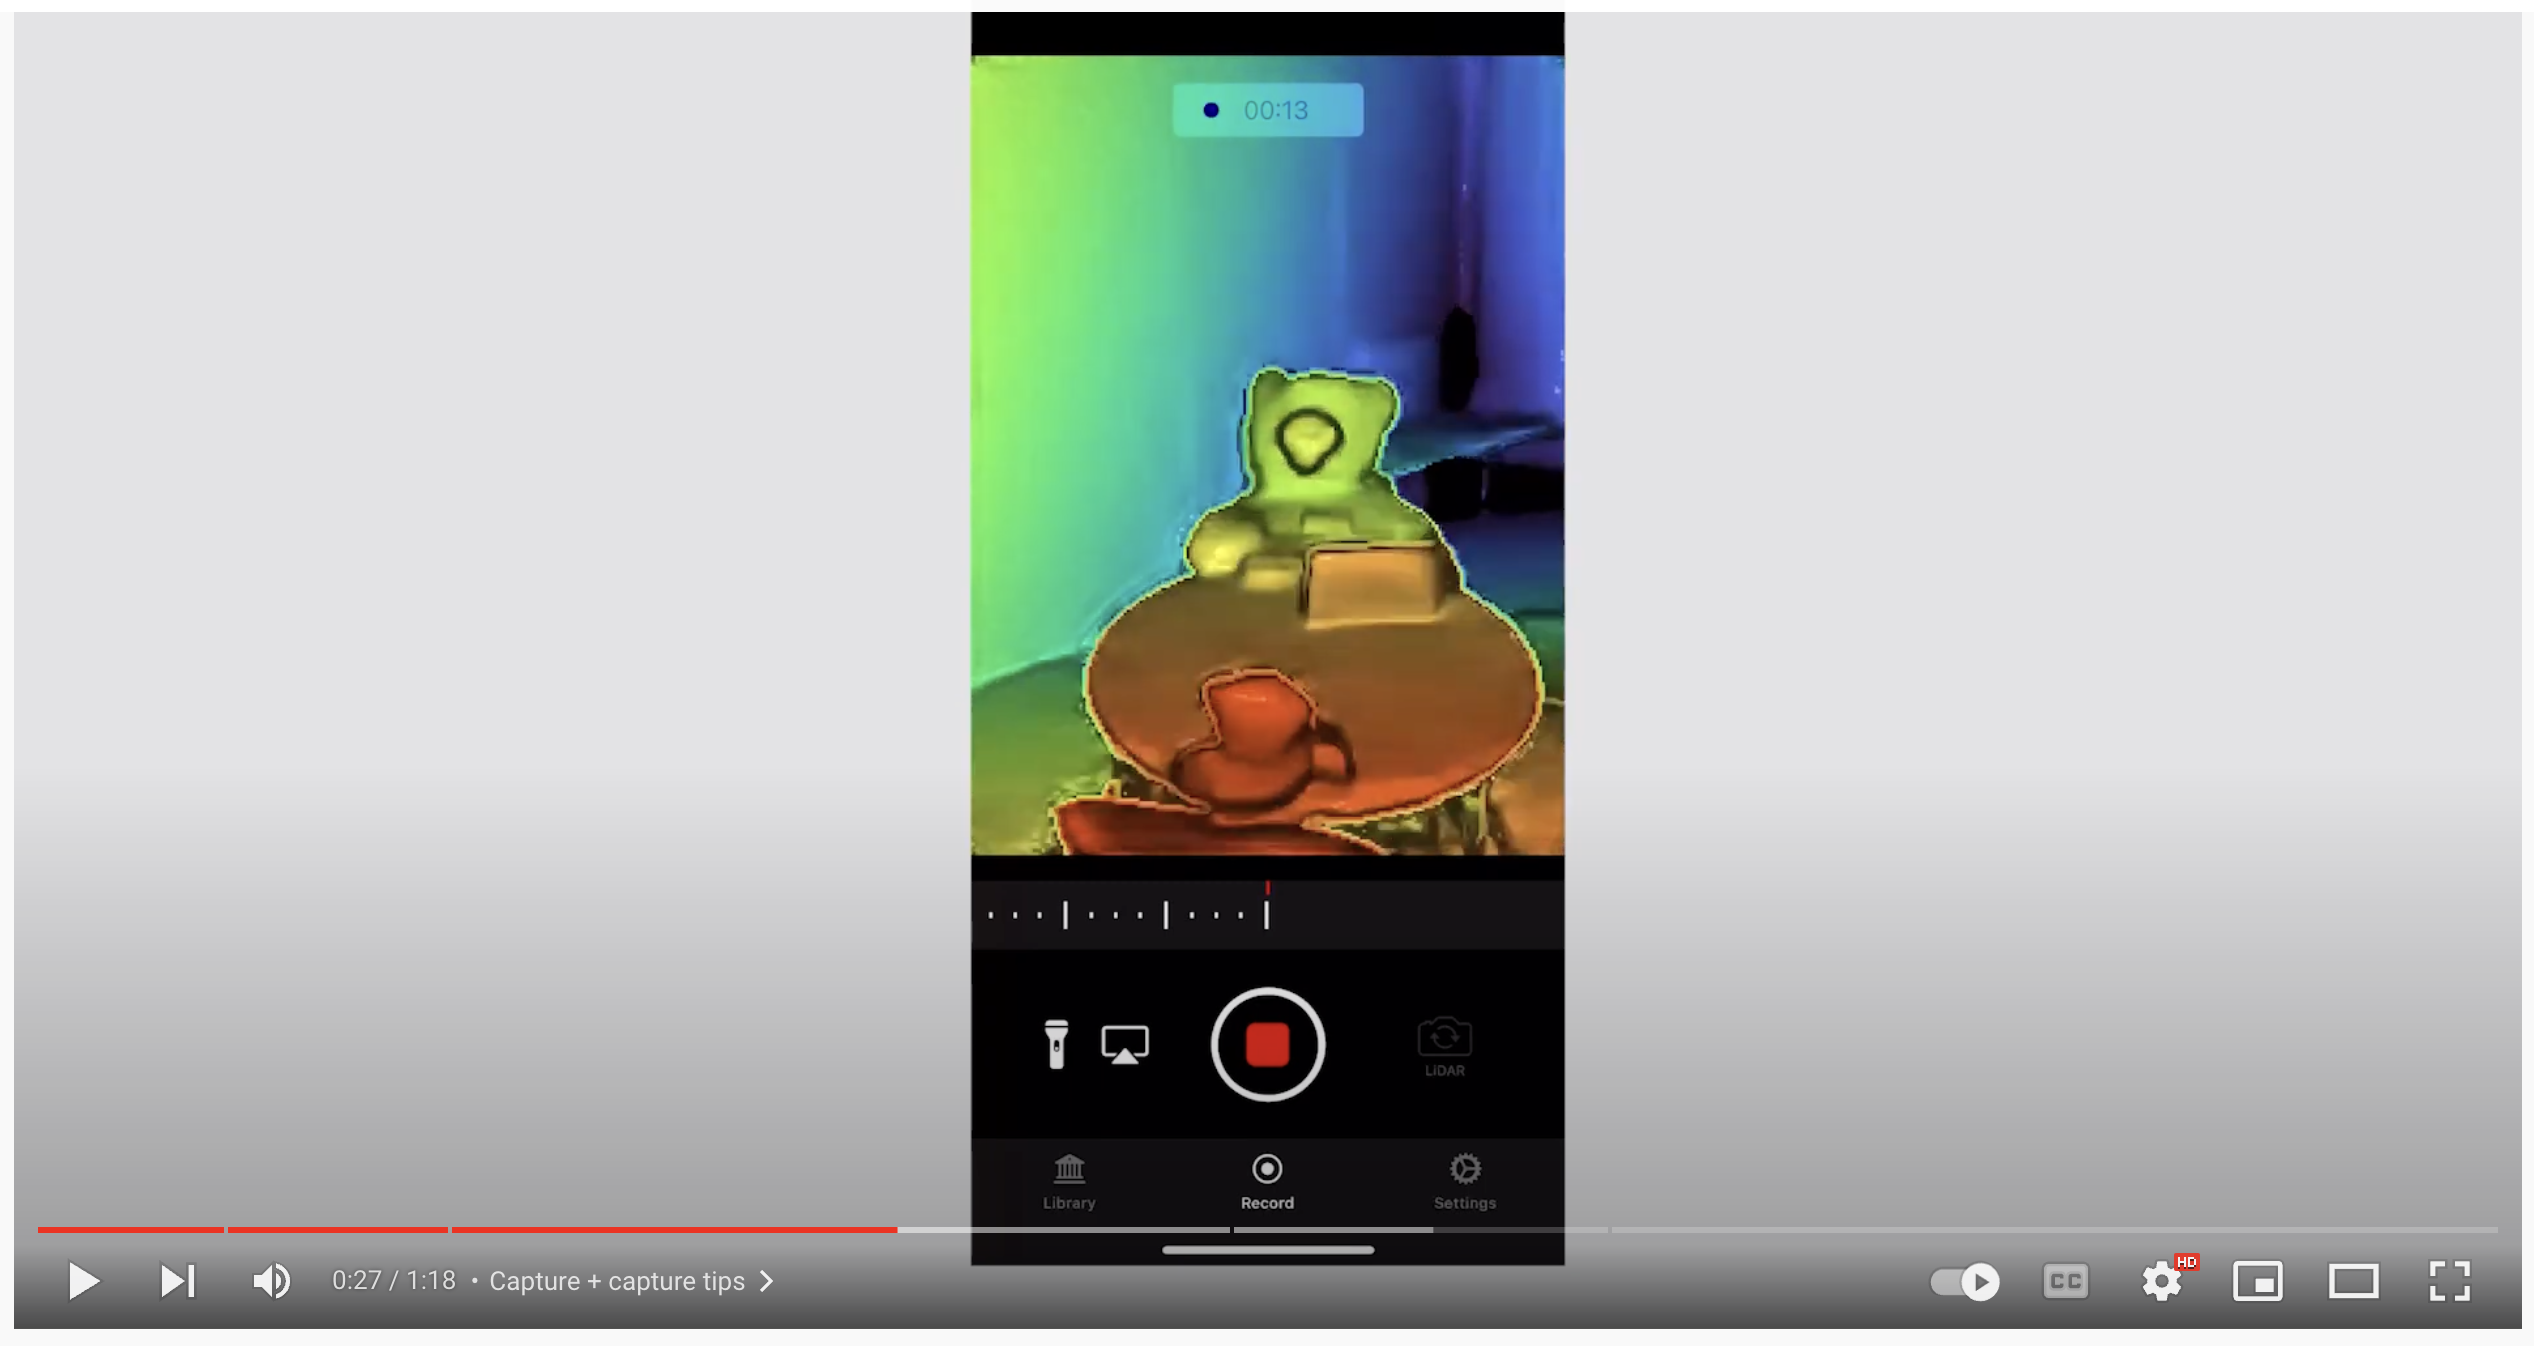
At a high level, you can follow these 3 steps:
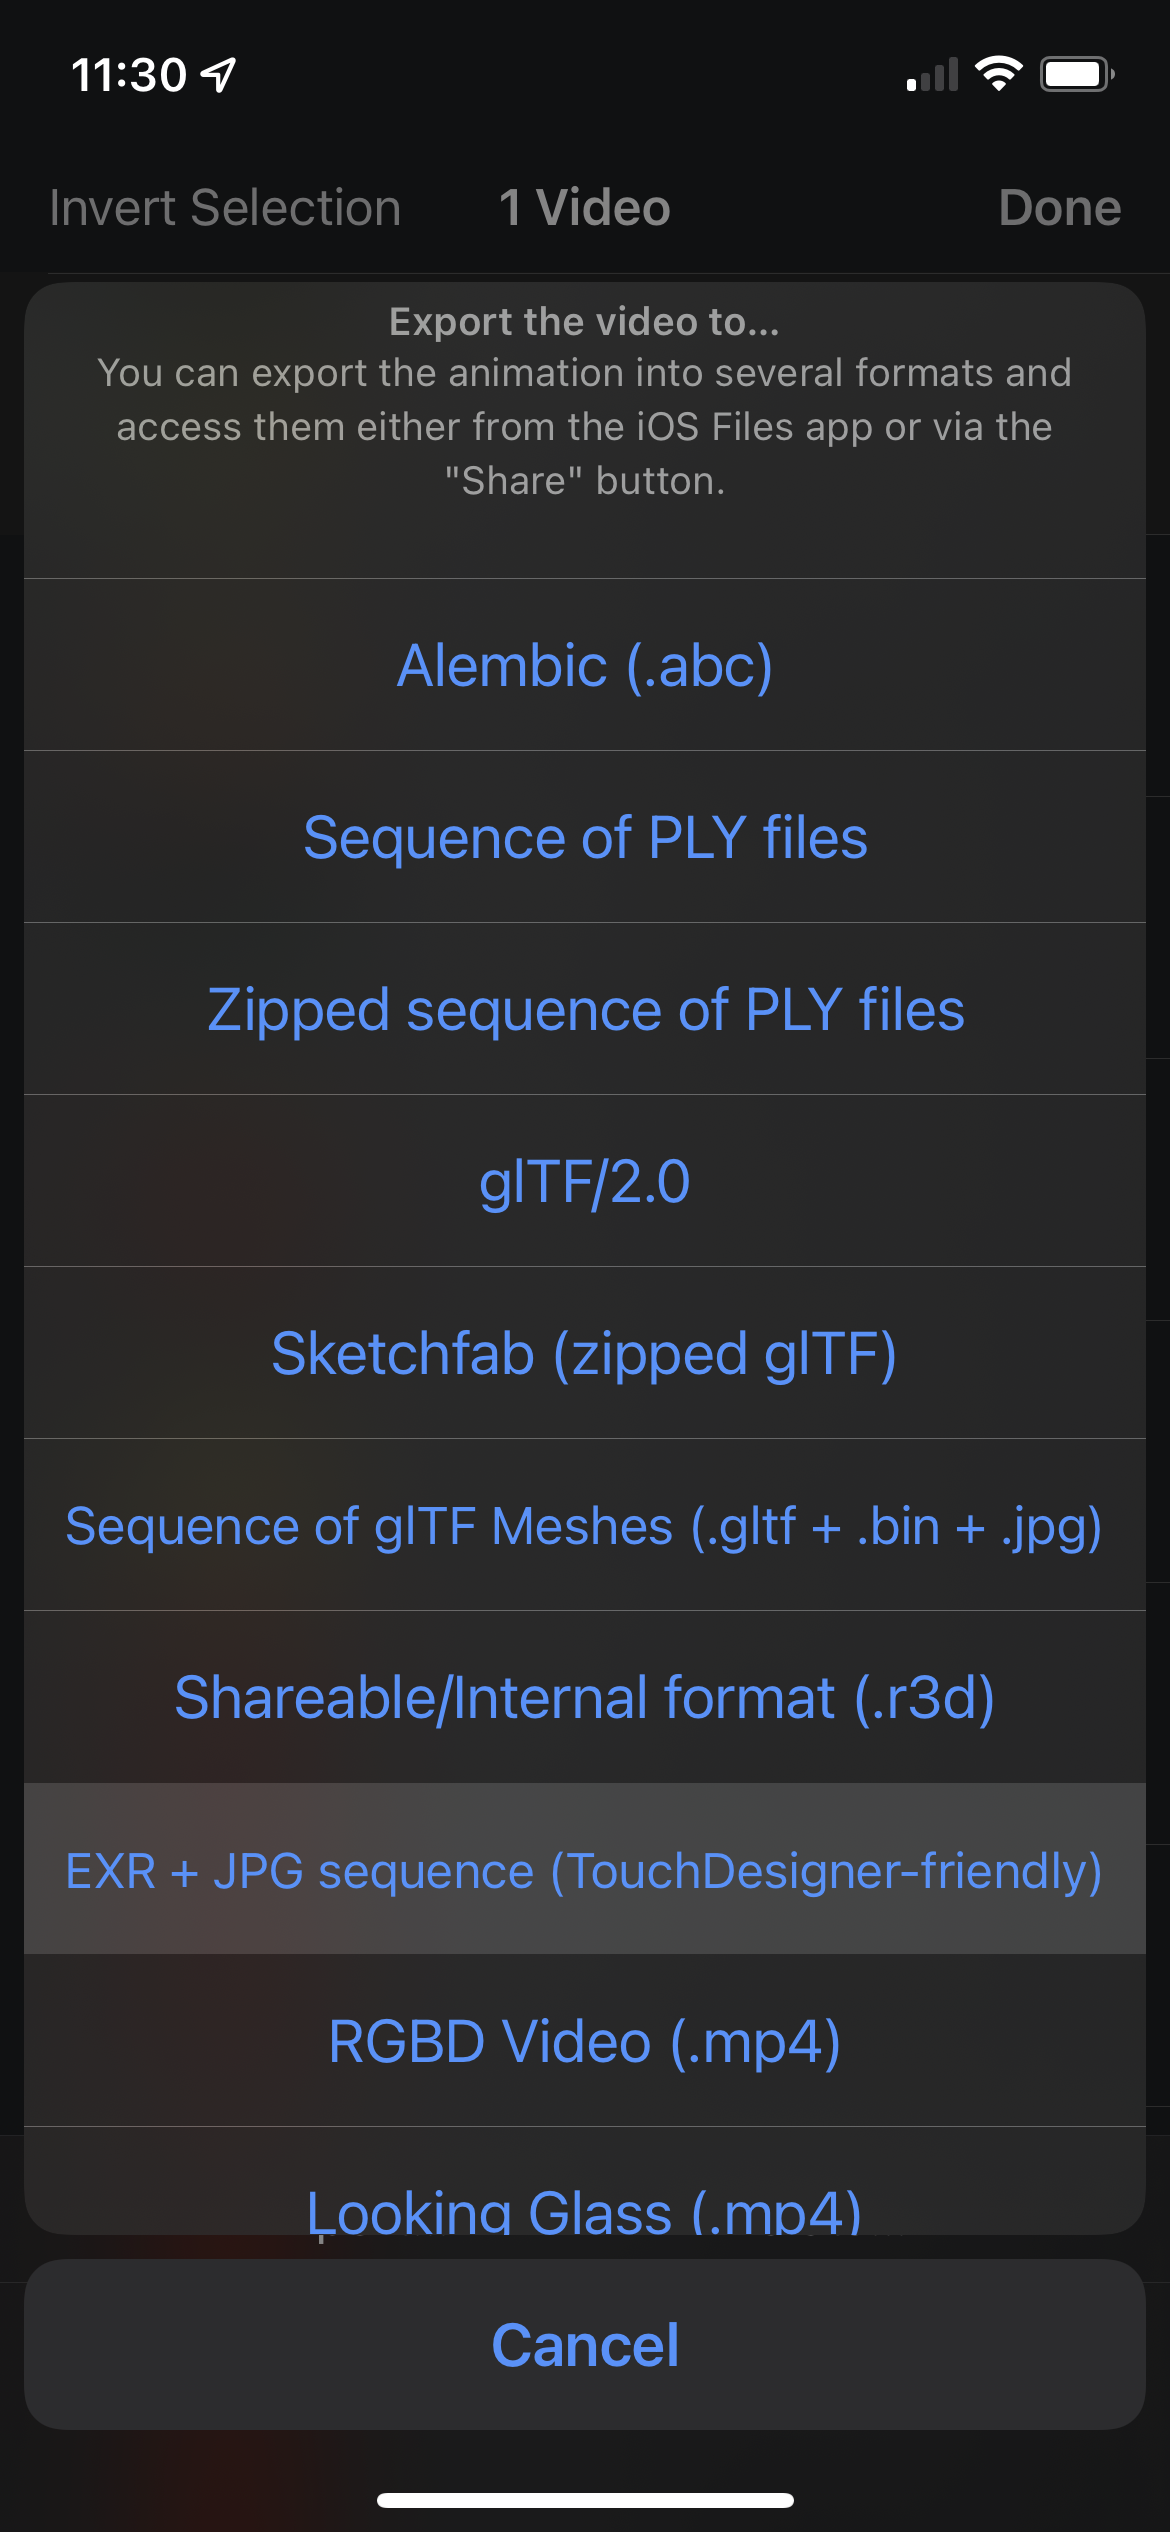
Record a video and export with the EXR + JPG sequence format.
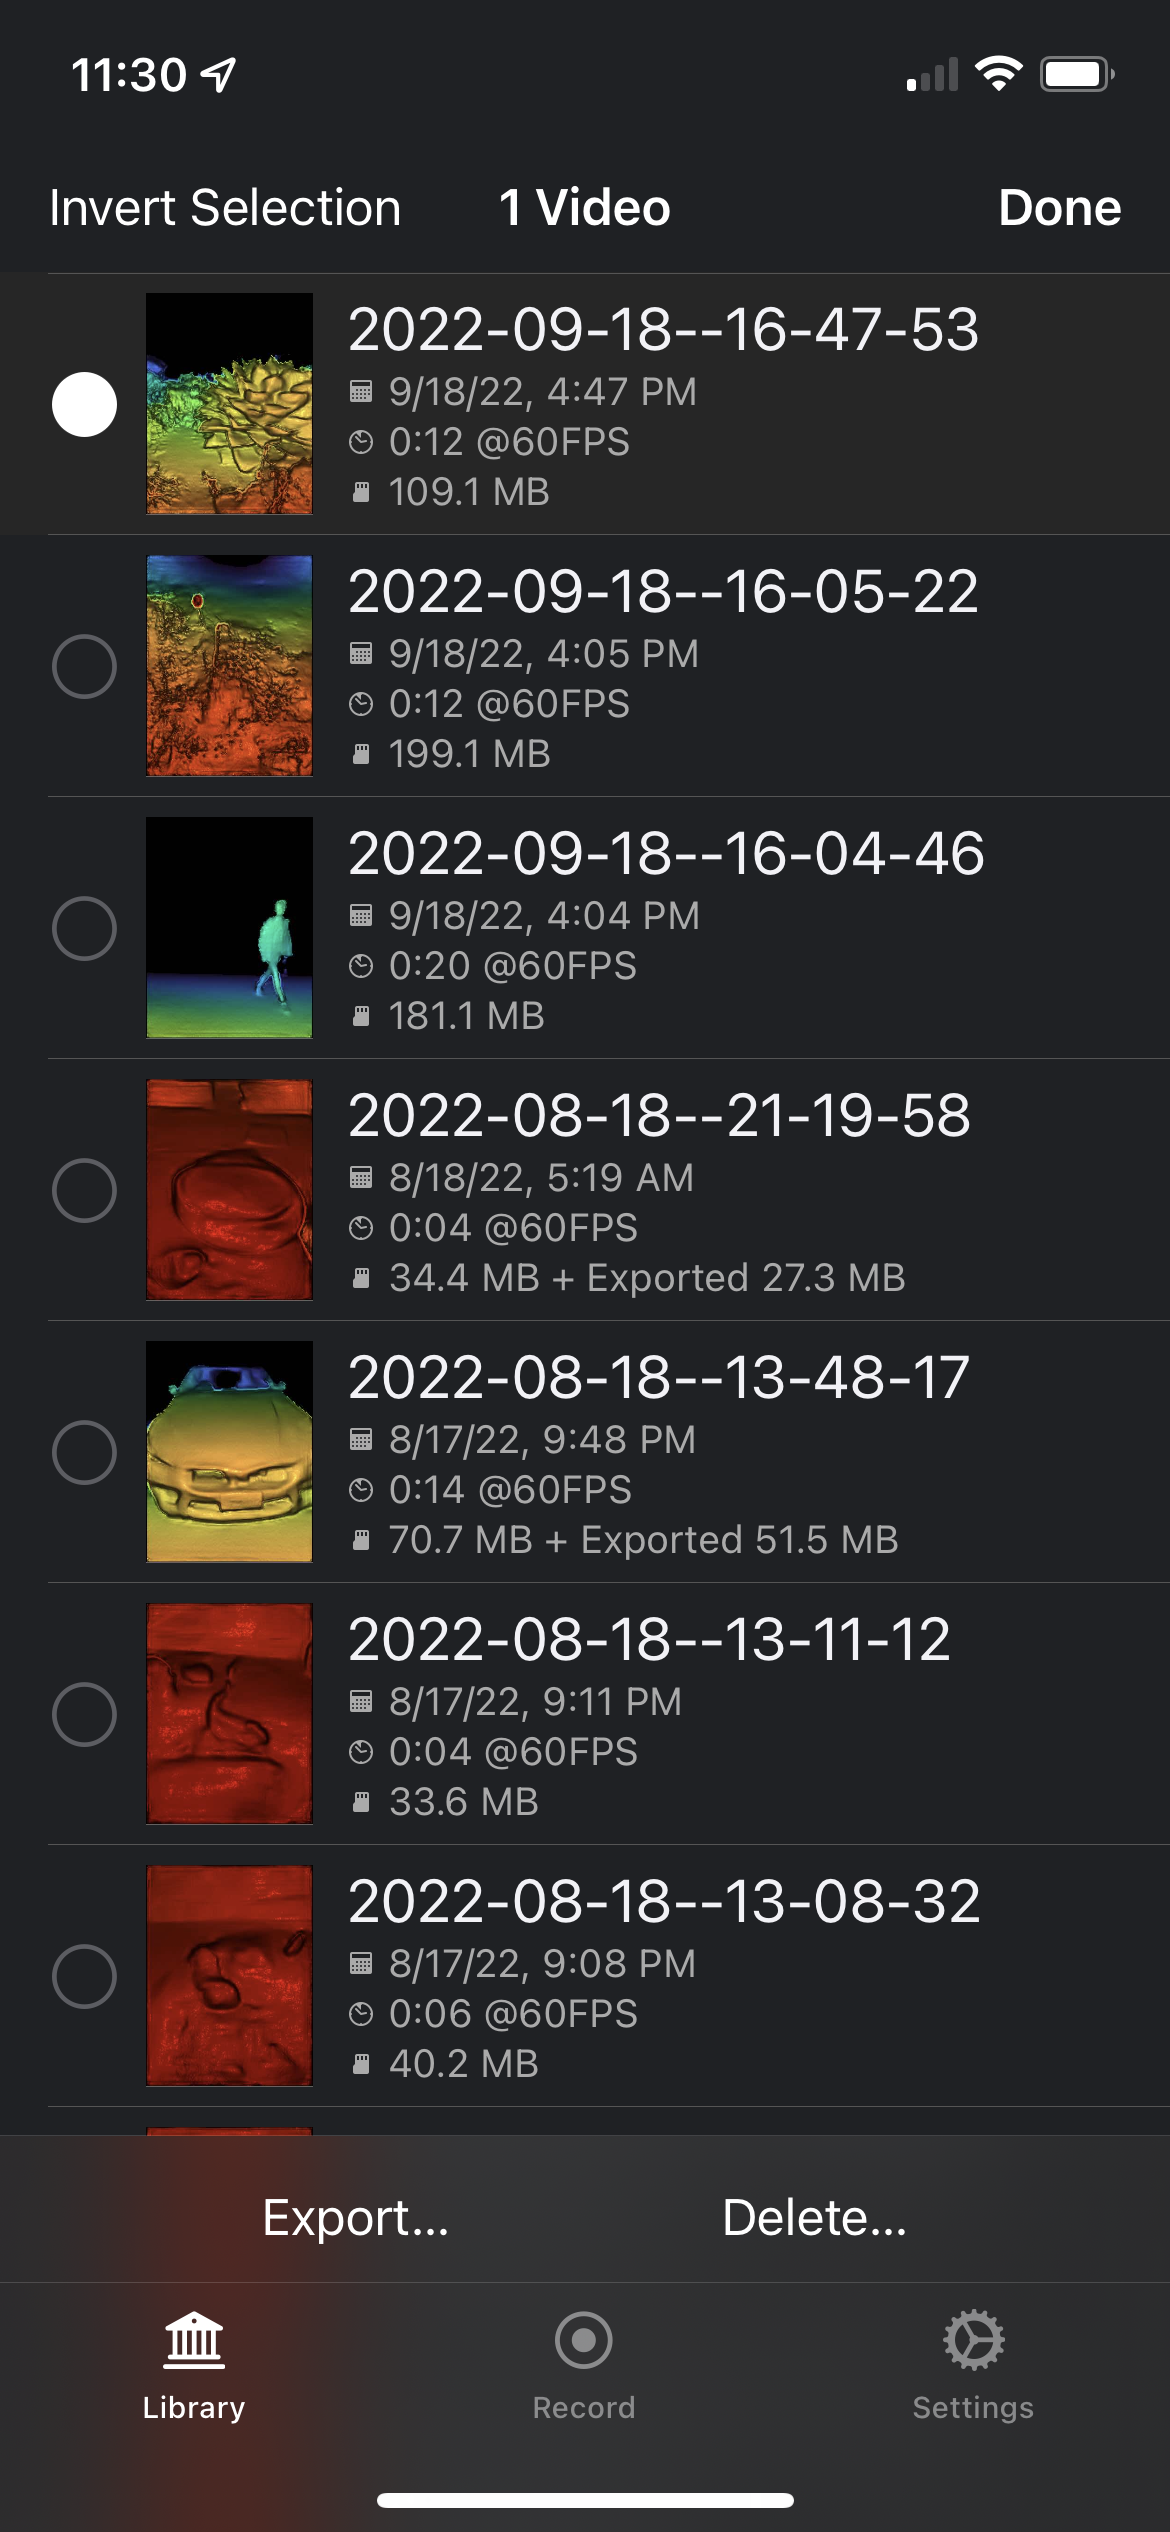
Then, move the exported capture folder from your iPhone to your computer.
Convert the data to the nerfstudio format.
ns-process-data record3d --data {data directory} --output-dir {output directory}
Train with nerfstudio!
ns-train nerfacto --data {output directory}
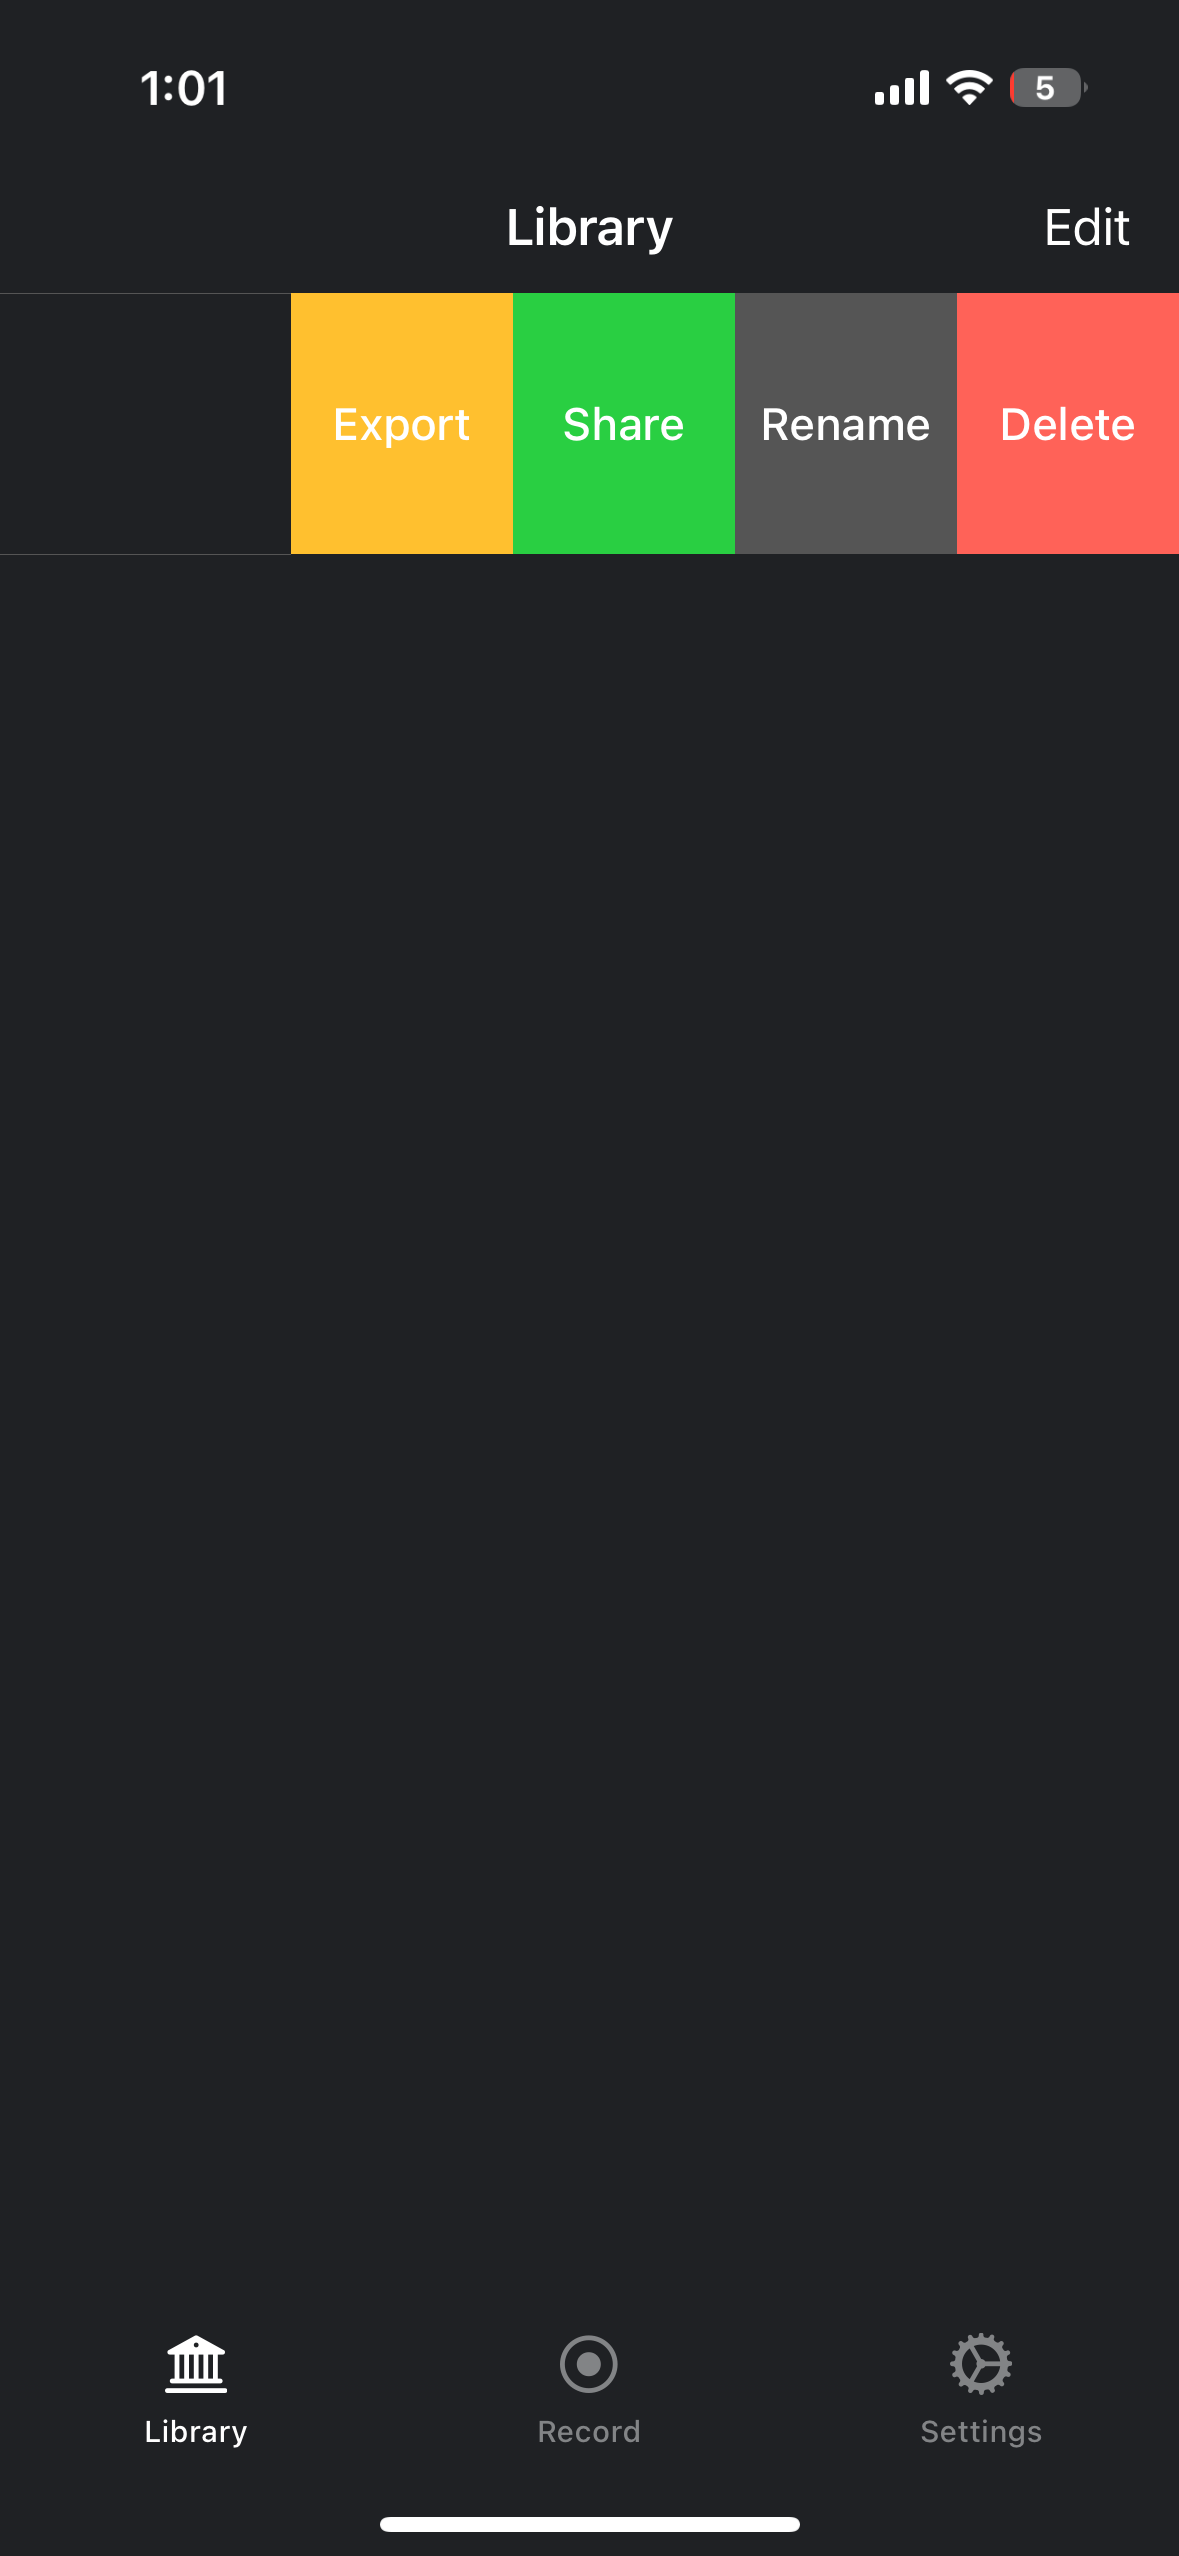
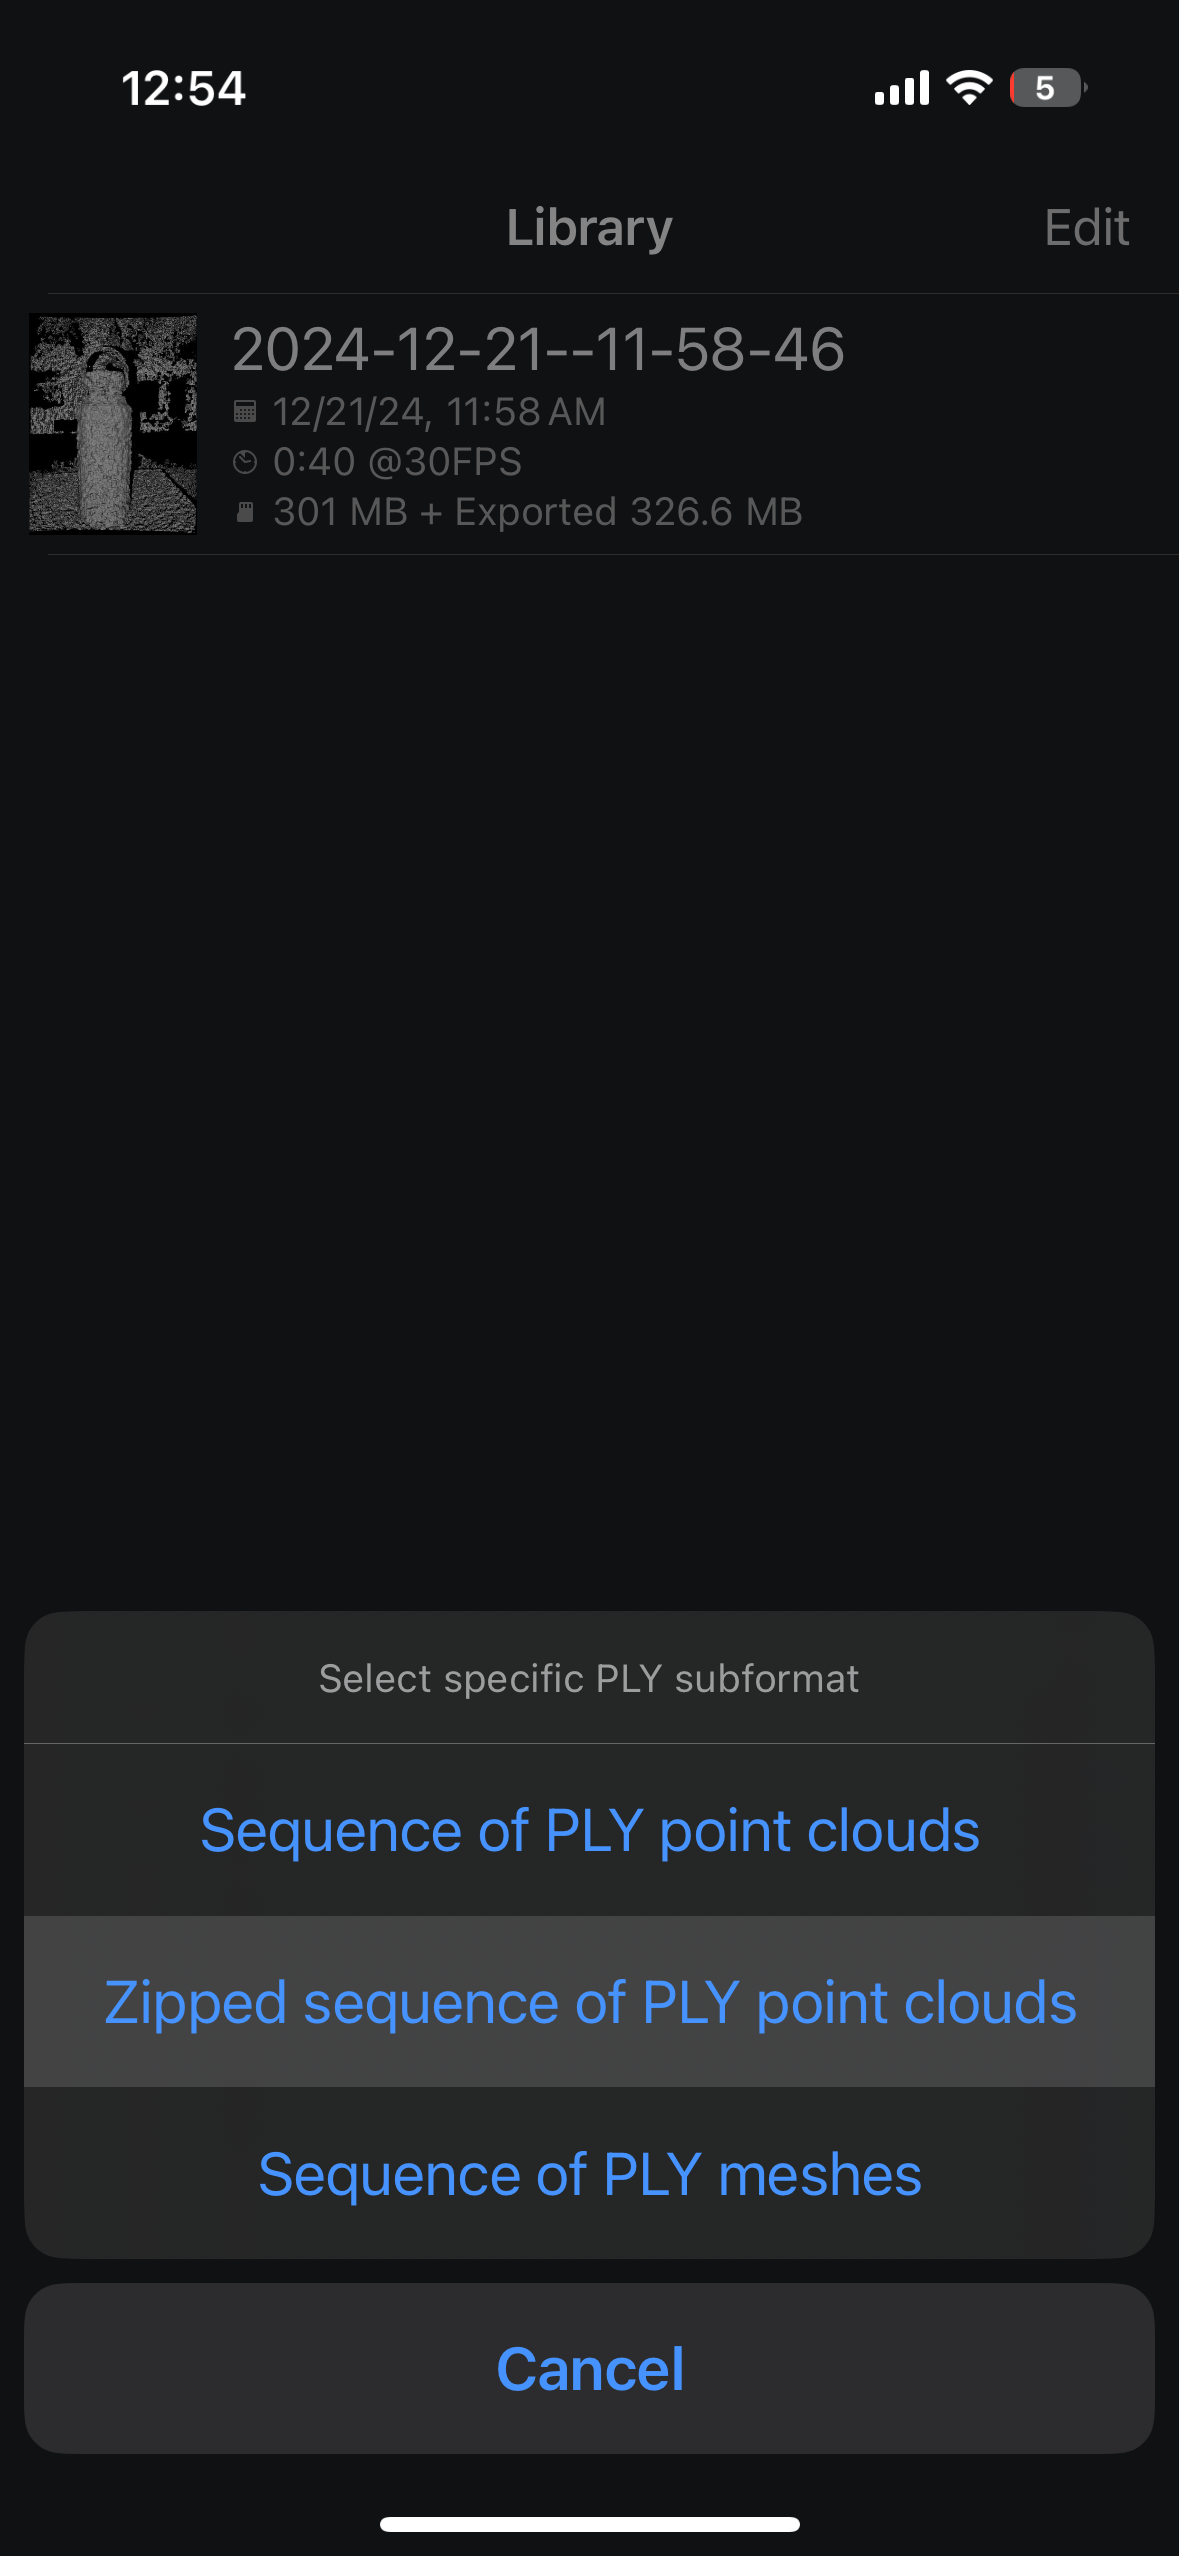
Adding a Point Cloud#
Adding a point cloud is useful for avoiding random initialization when training gaussian splats. To add a point cloud using Record3D follow these steps:
Export a Zipped sequence of PLY point clouds from Record3D.
Move the exported zip file to your computer from your iPhone.
Unzip the file and move all extracted
.plyfiles to a directory.Convert the data to nerfstudio format with the
--plyflag and the directory from step 3.
ns-process-data record3d --data {data directory} --ply {ply directory} --output-dir {output directory}
Additionally you can specify --voxel-size {float} which determines the level of sparsity when downsampling from the dense point clouds generated by Record3D to the sparse point cloud used in Nerfstudio. The default value is 0.8, lower is less sparse, higher is more sparse.
Spectacular AI#
Spectacular AI SDK and apps can be used to capture data from various devices:
iPhones (with LiDAR)
OAK-D cameras
RealSense D455/D435i
Azure Kinect DK
The SDK also records IMU data, which is fused with camera and (if available) LiDAR/ToF data when computing the camera poses. This approach, VISLAM, is more robust than purely image based methods (e.g., COLMAP) and can work better and faster for difficult data (monotonic environments, fast motions, narrow FoV, etc.).
Instructions:
Installation. With the Nerfstudio Conda environment active, first install the Spectacular AI Python library
pip install spectacularAI[full]
Install FFmpeg. Linux:
apt install ffmpeg(or similar, if using another package manager). Windows: see here. FFmpeg must be in yourPATHso thatffmpegworks on the command line.Data capture. See here for specific instructions for each supported device.
Process and export. Once you have recorded a dataset in Spectacular AI format and have it stored in
{data directory}it can be converted into a Nerfstudio supported format with:
sai-cli process {data directory} --preview3d --key_frame_distance=0.05 {output directory}
The optional --preview3d flag shows a 3D preview of the point cloud and estimated trajectory live while VISLAM is running. The --key_frame_distance argument can be tuned based on the recorded scene size: 0.05 (5cm) is good for small scans and 0.15 for room-sized scans. If the processing gets slow, you can also try adding a –fast flag to sai-cli process to trade off quality for speed.
Train. No separate
ns-process-datastep is needed. The data in{output directory}can now be trained with Nerfstudio:
ns-train nerfacto --data {output directory}
Metashape#
All images must use the same sensor type (but multiple sensors are supported).
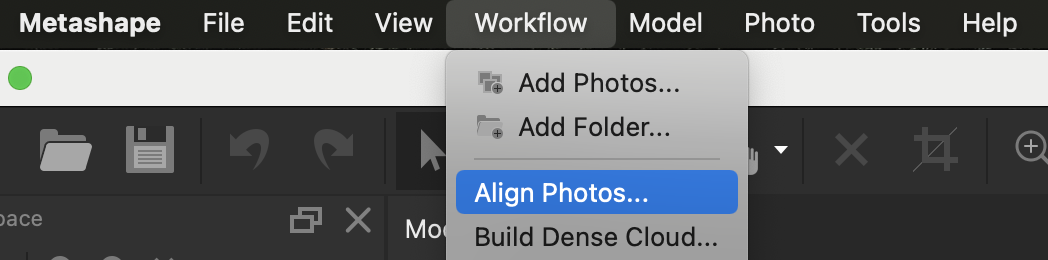
Align your images using Metashape.
File -> Workflow -> Align Photos...
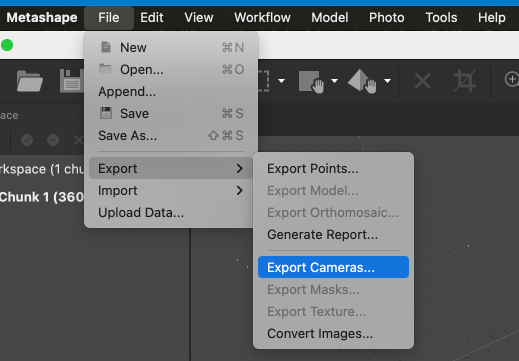
Export the camera alignment as a
xmlfile.File -> Export -> Export Cameras...
Convert the data to the nerfstudio format.
ns-process-data metashape --data {data directory} --xml {xml file} --output-dir {output directory}
Train with nerfstudio!
ns-train nerfacto --data {output directory}
RealityCapture#
Align your images using RealityCapture.
ALIGNMENT -> Align ImagesExport the camera alignment as a
csvfile. ChooseInternal/External camera parametersConvert the data to the nerfstudio format.
ns-process-data realitycapture --data {data directory} --csv {csv file} --output-dir {output directory}
Train with nerfstudio!
ns-train nerfacto --data {output directory}
ODM#
All images/videos must be captured with the same camera.
Process a dataset using ODM
$ ls /path/to/dataset
images
odm_report
odm_orthophoto
...
Convert to nerfstudio format.
ns-process-data odm --data /path/to/dataset --output-dir {output directory}
Train!
ns-train nerfacto --data {output directory}
Aria#
Install projectaria_tools:
conda activate nerfstudio
pip install projectaria-tools'[all]'
Download a VRS file from Project Aria glasses, and run Machine Perception Services to extract poses.
Convert to nerfstudio format.
ns-process-data aria --vrs-file /path/to/vrs/file --mps-data-dir /path/to/mps/data --output-dir {output directory}
Train!
ns-train nerfacto --data {output directory}
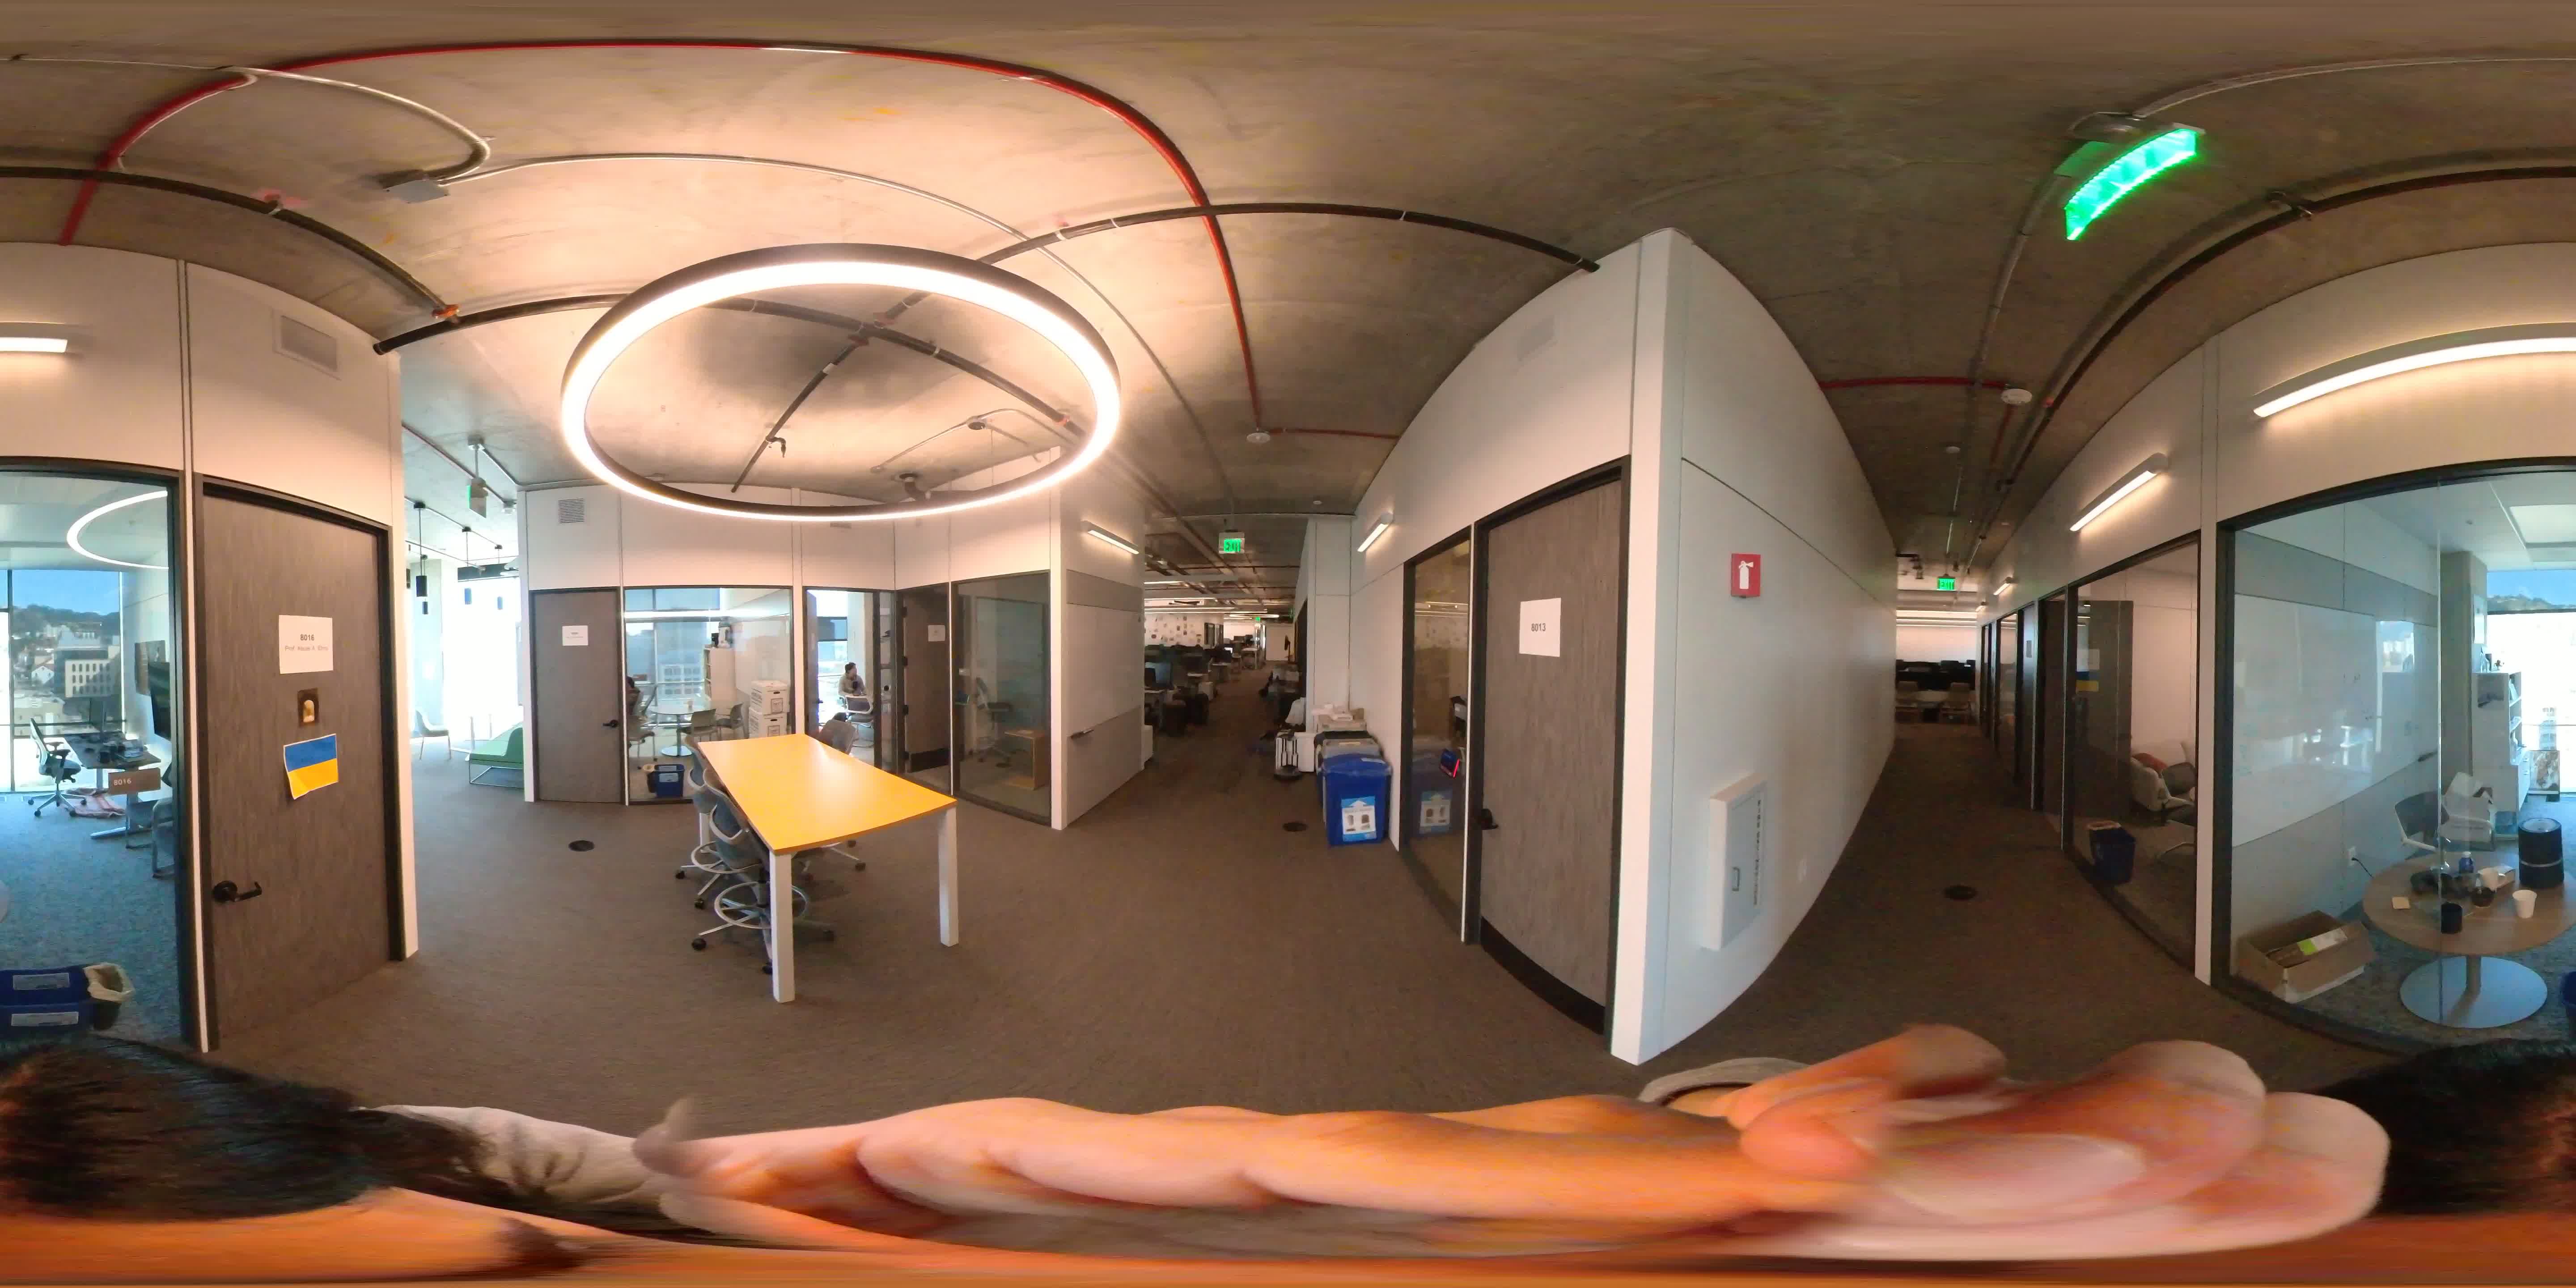
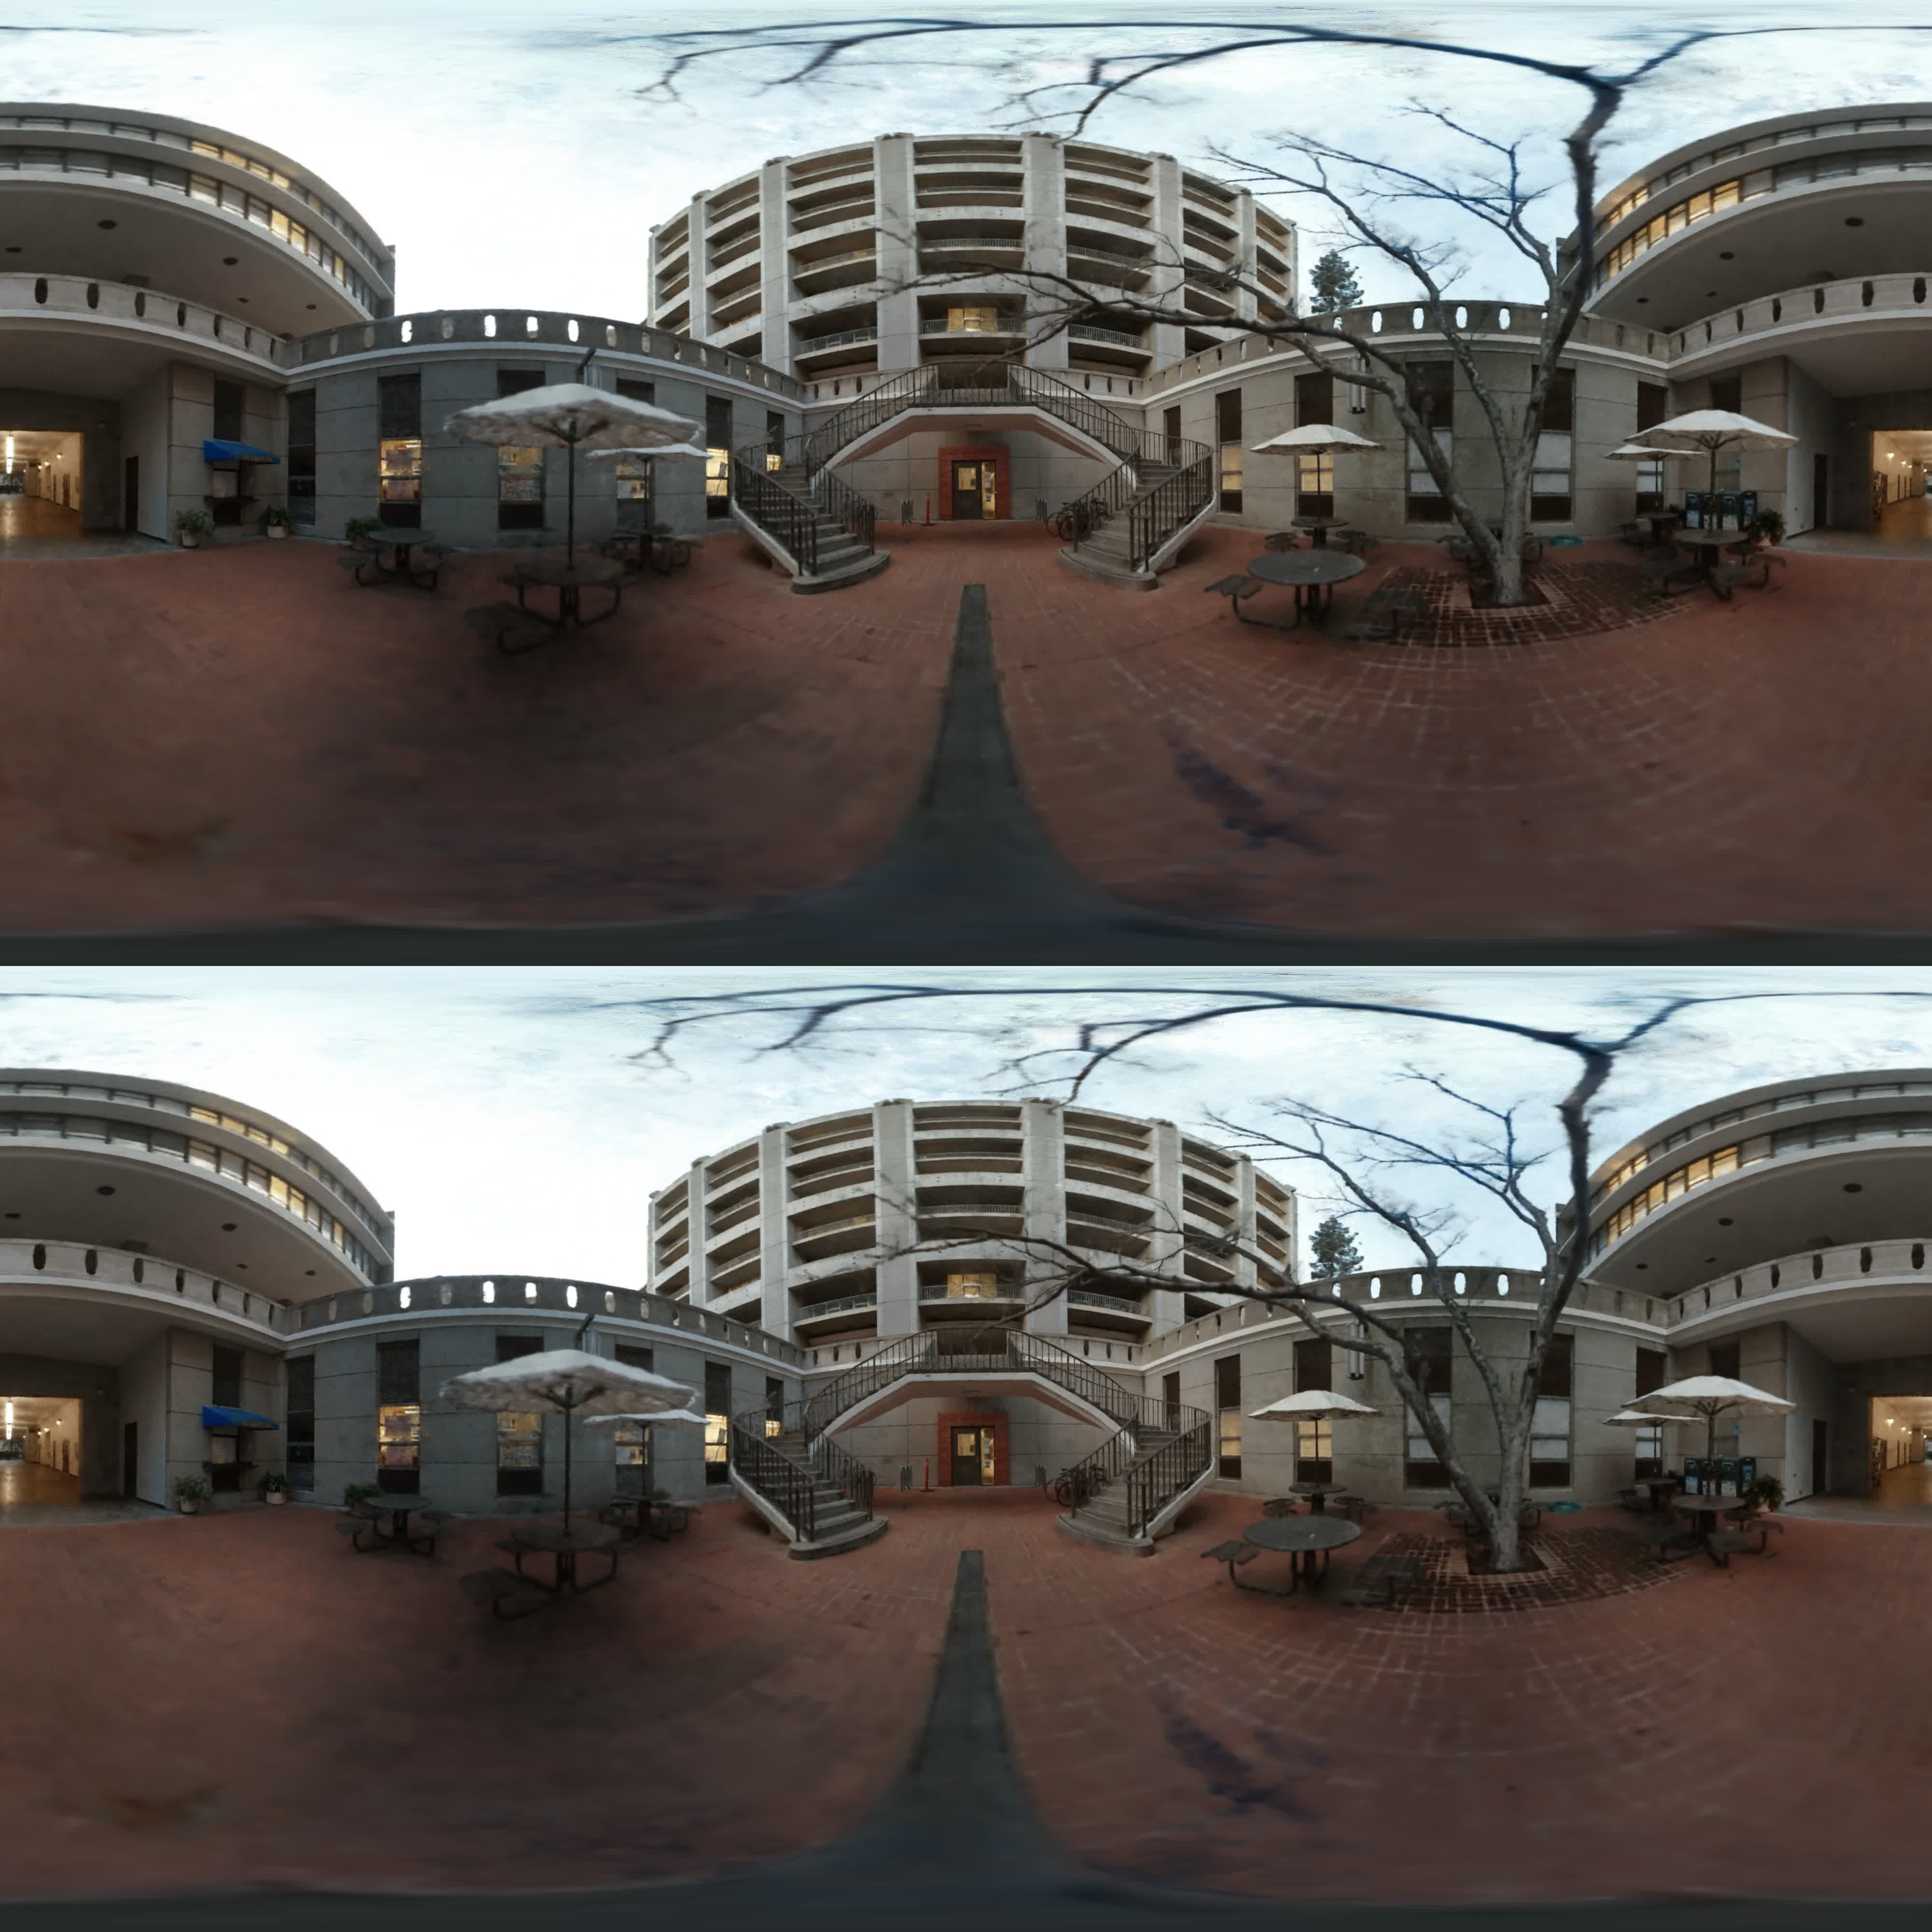
360 Data (Equirectangular)#
Equirectangular data is data that has been taken by a 360 camera such as Insta360. Both equirectangular image sets and videos can be processed by nerfstudio.
Images#
For a set of equirectangular images, process the data using the following command:
ns-process-data images --camera-type equirectangular --images-per-equirect {8, or 14} --crop-factor {top bottom left right} --data {data directory} --output-dir {output directory}
The images-per-equirect argument is the number of images that will be sampled from each equirectangular image. We have found that 8 images per equirectangular image is sufficient for most use cases so it defaults to that. However, if you find that there isn’t enough detail in the nerf or that colmap is having trouble aligning the images, you can try increasing the number of images per equirectangular image to 14. See the video section below for details on cropping.
Videos#
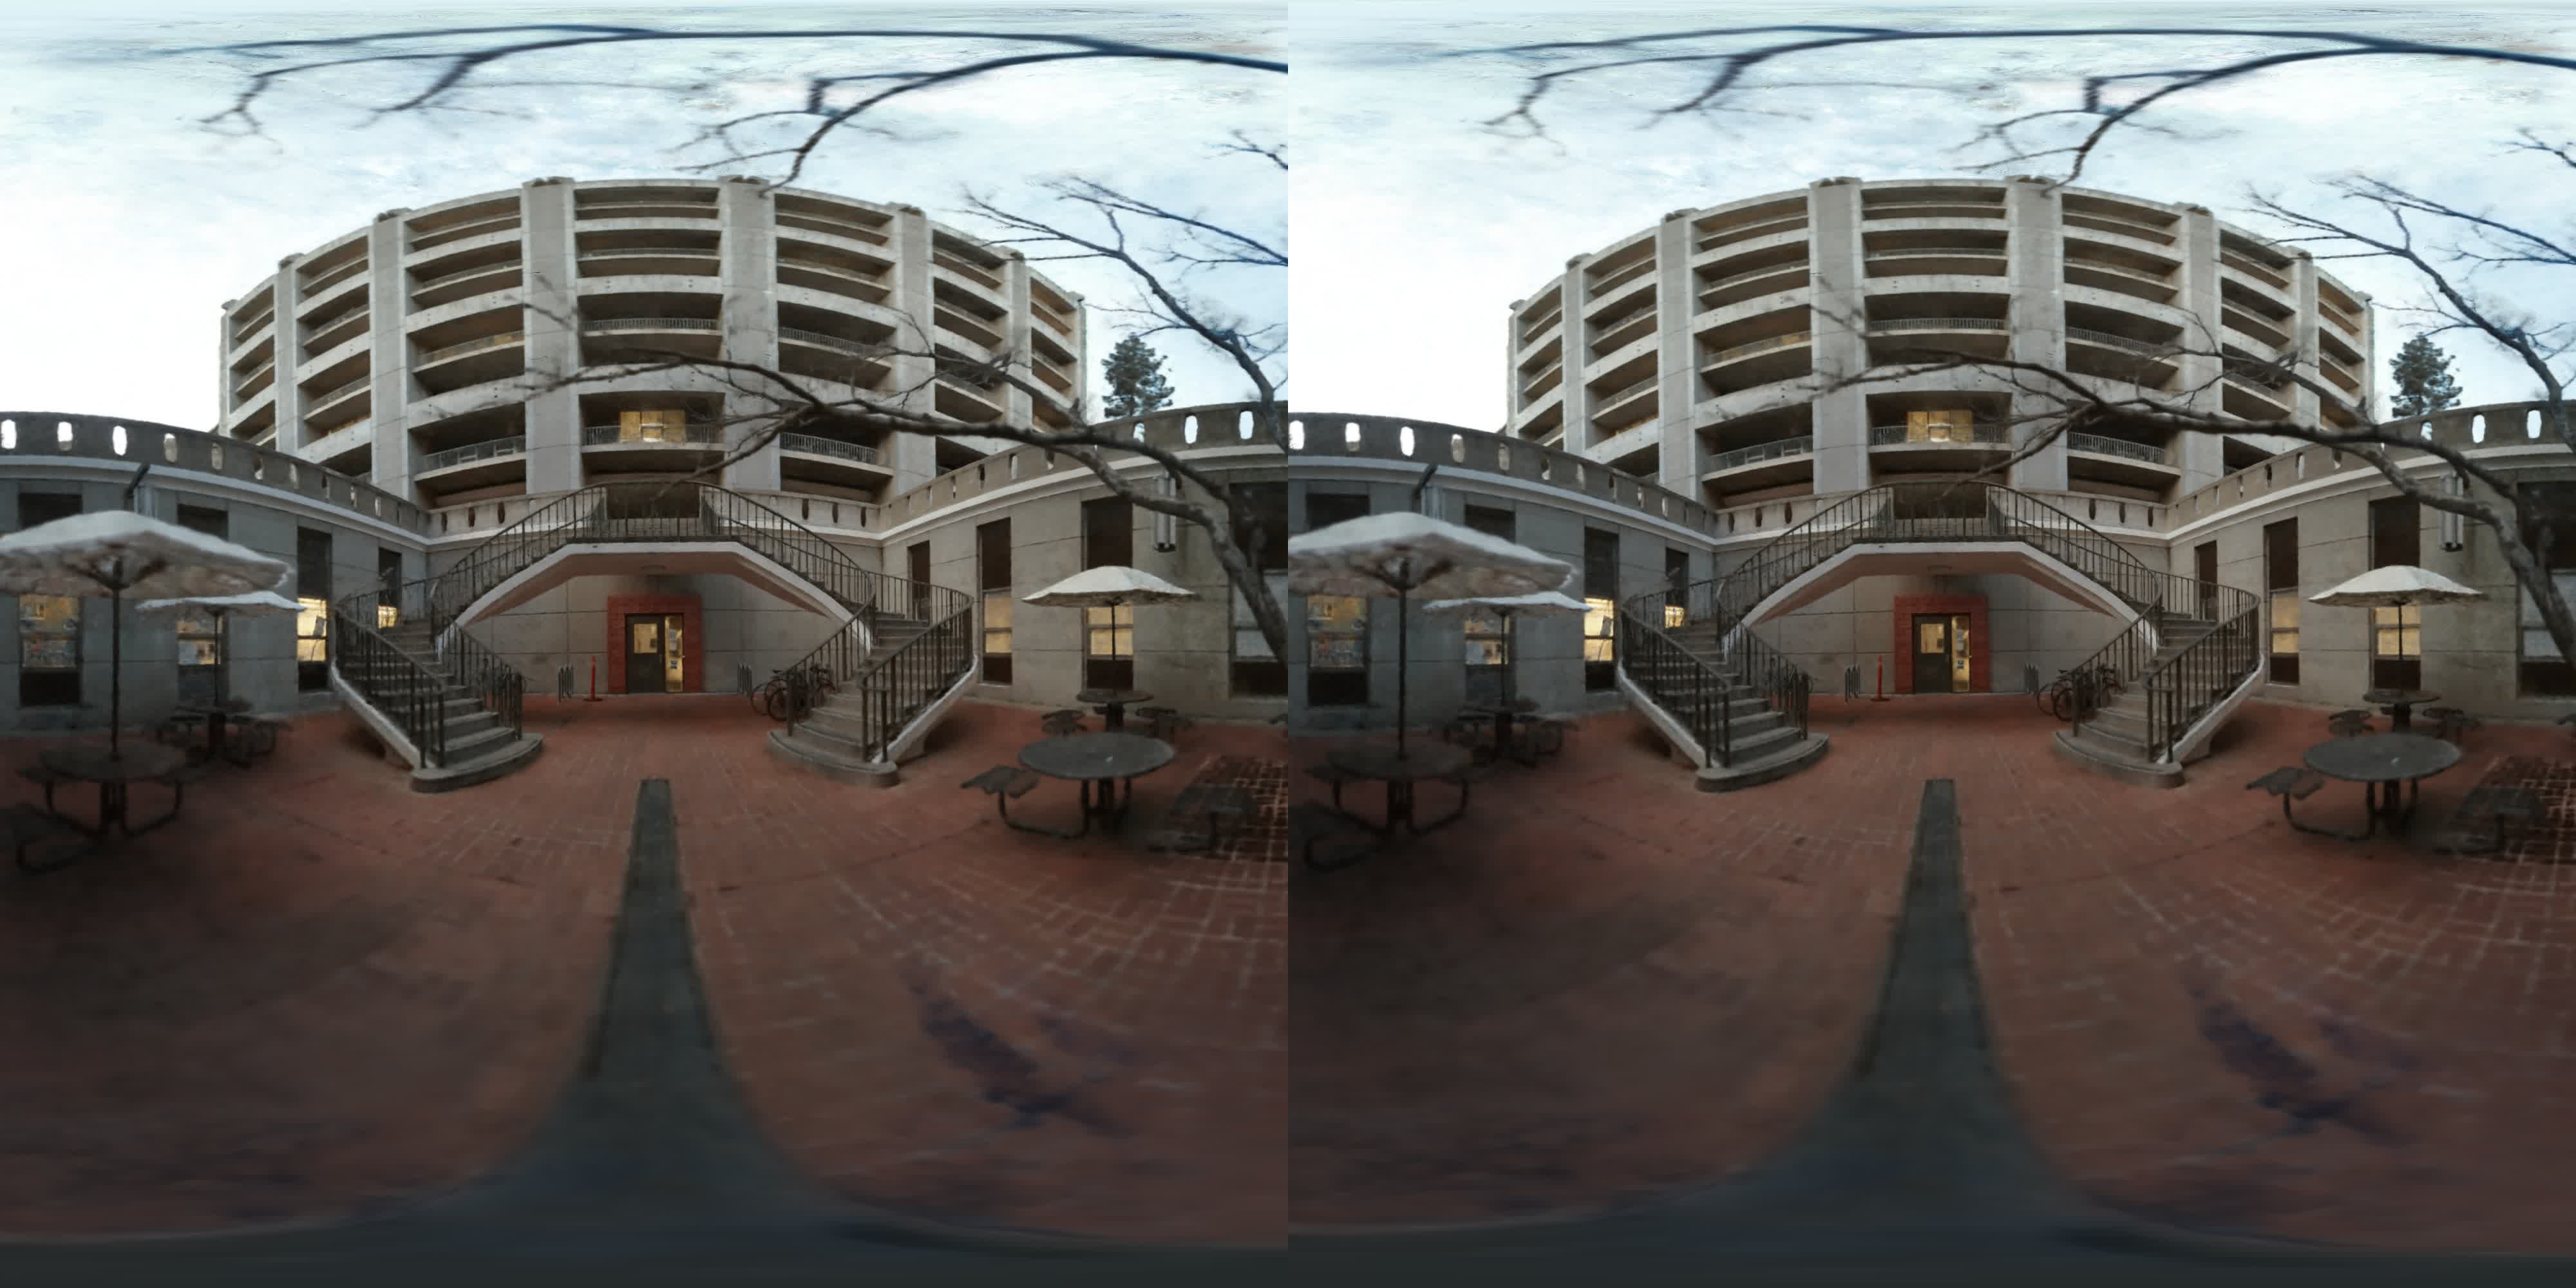
For videos we recommend taking a video with the camera held on top of your head. This will result in any unwanted capturer to just be in the bottom of each frame image and therefore can be cropped out.
For a video, process the data using the following command:
ns-process-data video --camera-type equirectangular --images-per-equirect {8, or 14} --num-frames-target {num equirectangular frames to sample from} --crop-factor {top bottom left right} --data {data directory} --output-dir {output directory}
See the equirectangular images section above for a description of the --images-per-equirect argument.
The num-frames-target argument is optional but it is recommended to set it to 3*(seconds of video) frames. For example, if you have a 30 second video, you would use --num-frames-target 90 (3*30=90). This number was chosen from a bit of experimentation and seems to work well for most videos. It is by no means a hard rule and you can experiment with different values.
The crop-factor argument is optional but often very helpful. This is because equirectangular videos taken by 360 cameras tend to have a portion of the bottom of the image that is the person who was holding the camera over their head.
The pixels representing the distorted hand and head are obviously not useful in training a nerf so we can remove it by cropping the bottom 20% of the image. This can be done by using the --crop-factor 0 0.2 0 0 argument.
If cropping only needs to be done from the bottom, you can use the --crop-bottom [num] argument which would be the same as doing --crop-factor 0.0 [num] 0.0 0.0
🥽 Render VR Video#
Stereo equirectangular rendering for VR video is supported as VR180 and omni-directional stereo (360 VR) Nerfstudio camera types for video and image rendering.
Omni-directional Stereo (360 VR)#
This outputs two equirectangular renders vertically stacked, one for each eye. Omni-directional stereo (ODS) is a method to render VR 3D 360 videos, and may introduce slight depth distortions for close objects. For additional information on how ODS works, refer to this writeup.
VR180#
This outputs two 180 deg equirectangular renders horizontally stacked, one for each eye. VR180 is a video format for VR 3D 180 videos. Unlike in omnidirectional stereo, VR180 content only displays front facing content.
Setup instructions#
To render for VR video it is essential to adjust the NeRF to have an approximately true-to-life real world scale (adjustable in the camera path) to ensure that the scene depth and IPD (distance between the eyes) is appropriate for the render to be viewable in VR. You can adjust the scene scale with the Nerfstudio Blender Add-on by appropriately scaling a point cloud representation of the NeRF. Results may be unviewable if the scale is not set appropriately. The IPD is set at 64mm by default but only is accurate when the NeRF scene is true to scale.
For good quality renders, it is recommended to render at high resolutions (For ODS: 4096x2048 per eye, or 2048x1024 per eye. For VR180: 4096x4096 per eye or 2048x2048 per eye). Render resolutions for a single eye are specified in the camera path. For VR180, resolutions must be in a 1:1 aspect ratio. For ODS, resolutions must be in a 2:1 aspect ratio. The final stacked render output will automatically be constructed (with aspect ratios for VR180 as 2:1 and ODS as 1:1).
Note
If you are rendering an image sequence, it is recommended to render as png instead of jpeg, since the png will appear clearer. However, file sizes can be significantly larger with png.
To render with the VR videos camera:
Use the Nerfstudio Blender Add-on to set the scale of the NeRF scene and create the camera path
Export a point cloud representation of the NeRF
Import the point cloud representation in Blender and enable the Nerfstudio Blender Add-on
Create a reference object such as a cube which may be 1x1x1 meter. You could also create a cylinder and scale it to an appropriate height of a viewer.
Now scale the point cloud representation accordingly to match the reference object. This is to ensure that the NeRF scene is scaled as close to real life.
To place the camera at the correct height from the ground in the scene, you can create a cylinder representing the viewer vertically scaled to the viewer’s height, and place the camera at eye level.
Animate the camera movement as needed
Create the camera path JSON file with the Nerfstudio Blender Add-on
Edit the JSON camera path file
Omni-directional Stereo (360 VR)
Open the camera path JSON file and specify the
camera_typeasomnidirectionalSpecify the
render_heightandrender_widthto the resolution of a single eye. The width:height aspect ratio must be 2:1. Recommended resolutions are 4096x2048 or 2048x1024.
VR180
Open the camera path JSON file and specify the
camera_typeasvr180Specify the
render_heightandrender_widthto the resolution of a single eye. The width:height aspect ratio must be 1:1. Recommended resolutions are 4096x4096 or 2048x2048.

Save the camera path and render the NeRF
Note
If the depth of the scene is unviewable and looks too close or expanded when viewing the render in VR, the scale of the NeRF may be set too small. If there is almost no discernible depth, the scale of the NeRF may be too large. Getting the right scale may take some experimentation, so it is recommended to either render at a much lower resolution or just one frame to ensure the depth and render is viewable in the VR headset.
Additional Notes#
Rendering with VR180 or ODS can take significantly longer than traditional renders due to higher resolutions and needing to render a left and right eye view for each frame. Render times may grow exponentially with larger resolutions.
When rendering VR180 or ODS content, Nerfstudio will first render the left eye, then the right eye, and finally vertically stack the renders. During this process, Nerfstudio will create a temporary folder to store the left and right eye renders and delete this folder once the final renders are stacked.
If rendering content where the camera is stationary for many frames, it is recommended to only render once at that position and extend the time in a video editor since ODS renders can take a lot of time to render.
It is recommended to render a preliminary render at a much lower resolution or frame rate to test and ensure that the depth and camera position look accurate in VR.
The IPD can be modified in the
cameras.pyscript as the variablevr_ipd(default is 64 mm).Compositing with Blender Objects and VR180 or ODS Renders
Configure the Blender camera as panoramic and equirectangular. For the VR180 Blender camera, set the panoramic longitude min and max to -90 and 90.
Change the Stereoscopy mode to “Parallel” set the Interocular Distance to 0.064 m.